Difference between revisions of "Getting Started Guide (Arma 3)"
TuffShitSki (talk | contribs) m |
|||
| (60 intermediate revisions by 6 users not shown) | |||
| Line 1: | Line 1: | ||
| − | This Getting Started Guide for ArmA 3 provides basic guidance on getting started with [[ArmA 3]] at [[United Operations]]. It covers the proper synchronization to our [[:Category:ArmA_3_Modpack|modpack]] using [http:// | + | This Getting Started Guide for ArmA 3 provides basic guidance on getting started with [[ArmA 3]] at [[United Operations]]. It covers the proper synchronization to our [[:Category:ArmA_3_Modpack|modpack]] using [http://steamcommunity.com/sharedfiles/filedetails/?id=851438999 Steam Workshop], how to connect to our servers, and the important things you need to know for your first play session at UO as well as further reading. |
| − | |||
| − | |||
== Prerequisites == | == Prerequisites == | ||
| − | Before you start playing [[ArmA 3]] with us you'll need to acquire a few prerequisites: [[Teamspeak 3]] for in-game and out-of-game communication and a [http://forums.unitedoperations.net/ | + | Before you start playing [[ArmA 3]] (with APEX DLC) with us you'll need to acquire a few prerequisites: [[Teamspeak 3]] for in-game and out-of-game communication and a [http://forums.unitedoperations.net/ Forum Account], <s>you will also need to link your Teamspeak 3 profile with your forum account</s>. For a walk through on installing and setting up our prerequisites see: |
:[[Getting Started at UO]] | :[[Getting Started at UO]] | ||
| − | |||
| − | |||
| − | == Addon Synchronization - | + | == Addon Synchronization - Steam Workshop == |
Before you can successfully connect to our ArmA 3 servers you need to download our [[:Category:ArmA 3 Modpack|modpack]]. | Before you can successfully connect to our ArmA 3 servers you need to download our [[:Category:ArmA 3 Modpack|modpack]]. | ||
| − | If you do not already have any of our mods at all this can take a considerable amount of time as | + | If you do not already have any of our mods at all this can take a considerable amount of time as the mods you need to download are considerable in size. If you have played elsewhere with mods before coming to play with us there is a likelyhood you already have some of our mods, in that event we will simply re-use those mods and the download time will be smaller. |
'''''Please launch the game at least once normally, through Steam, to ensure that all updates are processed fully. Do this before you continue with this guide or attempt to install any mods, and after all updates to ArmA 3.''''' | '''''Please launch the game at least once normally, through Steam, to ensure that all updates are processed fully. Do this before you continue with this guide or attempt to install any mods, and after all updates to ArmA 3.''''' | ||
| + | === <strong>Required - Modpack Collection</strong> === | ||
| + | Install the Modpack/Collection - [http://steamcommunity.com/sharedfiles/filedetails/?id=851438999 United Operations - Modpack Collection]<br> | ||
| + | <br>[[File:steam_a3_modpack_collection.png]] | ||
| + | |||
| + | Confirm that The following addons are selected in the ArmA 3 Launcher.<br> | ||
| + | Once Subscribed, the following mods should now appear in your ArmA 3 Launcher - Check-mark all of the following mods.<br> | ||
| + | If these addons are updated, Steam will automatically download these in the background, or when you are connected to Steam. | ||
| + | <br> | ||
| + | [[File:steam_a3_addons.png]]<br> | ||
| + | |||
| + | === <strong>Optional - Bypassing BattlEye</strong> === | ||
| + | Due to the development of content in our community, we frequently are running development versions of software. These updates may require BattlEye to be disabled to connect to the server.<br> | ||
| + | <br> | ||
| + | If the an update requires BattlEye to be disabled - The Server Channel in Teamspeak will be updated to reflect this requirement. <br> | ||
| + | <br> | ||
| + | Normal Server Name - "UnitedOperations.Net - SRV1 - ACE/ACRE2"<br> | ||
| + | Disabled BattlEye Server Name - "UnitedOperations.Net - SRV1 - BE OFF"<br> | ||
| + | <br> | ||
| + | To connect to the servers without BattlEye, select the Battleye Tab in the launcher and uncheck "Enable BattlEye anti-cheat software".<br> | ||
| + | <br> | ||
| + | [[File:steam_a3_disable_battleye.png]] | ||
| + | |||
| + | == Connecting to the Server - General Info == | ||
| + | Server Passwords | ||
| + | In order to connect to our servers, you will need to obtain the Server Password - [http://forums.unitedoperations.net/index.php/page/ArmA3/servers Located Here]. | ||
| + | |||
| + | === <strong>Modpack Install - Updates</strong> === | ||
| + | Upon the first install of the modpack and or upon updates to the ACRE2 modification.<br> | ||
| − | + | Close Teamspeak 3<br> | |
| − | + | Launch ArmA 3 with the United Operations Moddpack Collection.<br> | |
| + | ArmA 3 will then install any ACRE2 Updates to Teamspeak 3.<br> | ||
| + | <br> | ||
| + | [[File:a3_acre2_install.png]]<br> | ||
| + | <br> | ||
| + | After ACRE2 Updates are installed, you can then reopen Teamspeak 3 and Connect to the server.<br> | ||
| − | + | === <strong>Teamspeak 3 - Connect to Server</strong> === | |
| − | + | Once you have the passwords from above, Open Teamspeak 3 and select the Connections Menu, then choose Connect. | |
| + | Enter the following information. | ||
| + | :Server Address: ''ts3.unitedoperations.net'' | ||
| + | :Nickname: ''Your Name Here'' | ||
| + | :Server Password: ''[http://forums.unitedoperations.net/index.php/page/ArmA3/servers Server Password - Located Here]'' | ||
| + | [[File:Ts3_connect.png]] | ||
| − | + | Feel free to bookmark the server to save this information. | |
| − | |||
| − | === <strong> | + | === <strong>ArmA 3 - Connect to Server</strong> === |
| − | + | Once you have the password start ArmA 3, navigate to the Multiplayer server browser, click the tab labeled "Direct Connect" in the tom left-hand corner and enter the following information into the corresponding boxes: | |
| − | [ | + | :IP: ''arma3.unitedoperations.net'' |
| + | :Port: ''2402'' | ||
| + | Then click OK. Then enter the [http://forums.unitedoperations.net/index.php/page/ArmA3/servers password]. | ||
| + | You will now be connected to the game server. | ||
| − | |||
| − | |||
| − | + | === <strong>ArmA3 - Saving Favorite Servers</strong> === | |
| − | + | One result should appear, save this server as Favorite. | |
| + | After you have played on the server once, it will appear in your recent servers, and you can favorite the server by enabling the gold star infront of the server name. This will cause the server to appear in the ArmA 3 Launcher. | ||
| − | |||
| − | |||
| − | + | === <strong>Misc - Help</strong> === | |
| − | + | If the event you cannot find our server using the above method please contact a Regular on our Teamspeak for assistance. | |
| − | + | == Your First ArmA 3 Session == | |
| − | |||
| − | === | + | === Joining the Server === |
| − | + | The "Primary" or UnitedOperations.Net - SRV1 - ACE/ACRE, is the main ArmA 3 server used for gameplay at United Operations. The server is up 24/7 (aside from occasional technical or administrative issues), and as long as there is room in the mission players are free to join (unless otherwise dictated by a pre-slotted event). For frequent play times please refer to the [[Arma_3_Average_Playtimes|average play times page]]. If you are disconnected while attempting to join, verify your mods are setup correctly according to the guide. | |
| − | [[ | ||
| − | + | If the server is full, you may wish to join the waiting room channel in Teamspeak until a new mission is started, typically players will inform those in the waiting room that a new mission is starting. | |
| − | |||
| − | + | [[File:A3 ts channels.jpg|frameless|918x918px]] | |
| − | [[File: | ||
| − | + | === Choosing a Slot === | |
| − | + | If the admin has not pushed to the mission to the briefing or in-game, wait to slot until the current mission leader (usually the player Platoon or Company Commander slot) calls for slots to be filled. The current leader may call specific slots or groups they wish filled. In the case of a Team vs Team mission, the server administrator will typically inform each side how many players they are allotted (in order to maintain the mission maker's intended ratio). | |
| − | + | For your first game, you should seek a easier role such as Rifleman, Grenadier, or Automatic Rifleman. This will allow you to become accustomed to our style of play and learn without being in a mission-critical role. The leader of a mission has the final say to any slots and who fills them, and will be enforced by the current admin by kicks/bans in necessary. If there is any confusion to what slot you should fill, feel free to ask. | |
| − | |||
| − | + | If the game is already underway and you are joining-in-progress (JIP), choose a slot in a group that ideally has a leader and members, avoid slotting into an empty squad if possible. | |
| − | ''' | + | '''Once slotted, ensure you note the player who is slotted into your groups leadership slot''' (usually a Squad/Section Leader, or Fire-Team Leader). This will be the player immediately in charge of you once in game. |
| + | [[File:Brief example.jpg|thumb|An example briefing screen with the plan marked up by the commander.]] | ||
| − | + | === Briefing === | |
| − | + | The briefing phase is where each side's leader will decide which course of action they will take, and inform the player's on their side to the plan. If the mission is Team vs Team, there is separate teamspeak channels that each side will utilize in order to brief seperetly before joining the SRV1 channel once briefing is complete. | |
| − | |||
| − | + | General talk is allowed between players via teamspeak and ingame chat before the leader is ready to brief, but keep in mind the [[Game Server SOPs|rules]] regarding conduct on the game server still apply. '''Once the leader is ready to brief, talking is not allowed unless the player is directly involved in the briefing (i.e. Squad Leaders, Pilots, etc)'''. This is enforced by the admin, and disruptive or uncooperative players will be kicked/banned. | |
| − | + | === Loading into Mission === | |
| − | + | Once briefing is complete, all players will move back up to the SRV1 teamspeak channel (if briefing multiple teams). Ensure you are in the correct channel, or ACRE will not function once ingame. Ensure that ArmA is not minimized before loading into game, often times tabbing back into ArmA once ingame will fire the player's weapon by accident. | |
| − | |||
| − | + | Once in game, stay in the immediate spawn location in order to facilitate organization. Identify the player from the slotting screen who is your immediate leader (either Squad or Fire-Team Leader) and await their orders. Familiarize yourself with the other players in your group, as this is who you will look for if you become separated during gameplay. | |
| − | |||
| − | |||
| − | |||
| − | |||
| − | |||
| − | |||
| − | |||
| − | |||
| − | + | If joining-in-progress, you may be able to teleport to your leader via the action menu (default: Scroll Wheel). If transport vehicles are slotted, await that vehicle to return to spawn to pick up players. Do not take vehicles or assets you are not slotted to operate. If unable to regroup with your group leader, find another group of friendlies to either direct you to your group, or temporarily join theirs. | |
| − | + | Blatant disregard for leader's orders and pre-movement organization will be met with warnings or possible kick/ban from the admin. Regulars and players are aware of difficulties new players can have, don't be afraid to ask your leader or fellow group members for help. | |
| − | + | === Gameplay === | |
| + | Once movement from the initial spawn location has begun, concentrate on staying with your group and listening for orders. Several guides are available in the UOTC Codex section of the wiki where players can learn some of the skills that will be useful on the primary. | ||
| − | + | Some general etiquette that is helpful to new players includes: | |
| − | |||
| − | + | # Use the ACRE volume control (default Tab + Scroll Wheel) to lower your talk volume when contact with enemy is expected. Limit talking to only when necessary to avoid giving away your position. | |
| + | # Map marking beyond the briefing phase is not allowed on Global and Side channels. If creating marks on the map for your own reference, ensure you are on the Direct or Group channel before making marks. | ||
| + | # Ensure you are not moving in front of other player's lines of fire, and be aware of friendly unit's movements to avoid friendly fire. | ||
| + | # Ask if you are unsure of the current weapon status (Green, Yellow, Red). Ensure if you are "Weapons Yellow" you only engage if fired on first or in immediate danger, to avoid giving away your group's location. | ||
| − | + | === Spectator === | |
| − | + | If you are killed, do not re-slot into a different slot in order to spawn again unless specifically directed by the admin or Game Moderator (usually due to mission-start mishaps, bugs, or administrative reasons). Those attempting to circumvent this will be subject to ban. | |
| − | |||
| − | |||
| − | + | Most missions will put killed players into a spectator screen where they can view the remaining players in the mission. ACRE should automatically separate dead players from live ones and allow them to talk while the mission continues. Ensure that game server [[Game Server SOPs|rules]] are maintained, aggressive or immature behavior towards other players will result in removal from the server or possible ban. | |
| + | === Mission End/New Mission Selection === | ||
| + | Once the mission is over, the admin will move to the mission selection screen, where players can request new missions at the appropriate player count be played. Mission requests are usually done via in-game chat to avoid players talking over one another. A short post-mission discussion may be allowed by the admin, but the admin may silence discussion in order to facilitate quick selection of the next mission. | ||
| − | |||
| − | |||
| − | It will likely take a few games for you learn the ropes of how we play here at [[United Operations]], | + | It will likely take a few games for you learn the ropes of how we play here at [[United Operations]], keep in mind the server [[Game Server SOPs|rules]] and abide by the behavior expectations in the [[United Operations Charter]]. Please do not hesitate to ask for help or assistance, and have fun. |
== Troubleshooting == | == Troubleshooting == | ||
| − | Having issues installing our modpack? [http://forums.unitedoperations.net/index.php/forum/197-technical-support/ Hop on over to our forums] | + | Having issues installing our modpack? [http://forums.unitedoperations.net/index.php/forum/197-technical-support/ Hop on over to our forums] or [https://discord.gg/0WqRco0nennZY05d/ Discord] we'll be happy to help you out. |
| + | |||
| + | == Recommended Reading == | ||
| + | * [http://forums.unitedoperations.net/index.php/page/index.html/_/required-reading/united-operations-charter-r49 United Operations Charter] | ||
| + | * [[Game Server SOPs|Game Server SOP]] | ||
| + | * [http://forums.unitedoperations.net/index.php/topic/7813-ban-formattingtimeframes-sops/#entry174288 Ban Guidelines] | ||
| + | * [https://www.youtube.com/watch?v=Pioba6xJ1Qw Familiarization Video] | ||
| + | * [http://forums.unitedoperations.net/index.php/topic/17220-uo-rules-and-etiquette-qa UO Rules and Etiquette Q&A] | ||
| − | [[Category: | + | [[Category: Arma 3 Guides]] |
Latest revision as of 04:51, 17 January 2019
This Getting Started Guide for ArmA 3 provides basic guidance on getting started with ArmA 3 at United Operations. It covers the proper synchronization to our modpack using Steam Workshop, how to connect to our servers, and the important things you need to know for your first play session at UO as well as further reading.
Contents
Prerequisites
Before you start playing ArmA 3 (with APEX DLC) with us you'll need to acquire a few prerequisites: Teamspeak 3 for in-game and out-of-game communication and a Forum Account, you will also need to link your Teamspeak 3 profile with your forum account. For a walk through on installing and setting up our prerequisites see:
Addon Synchronization - Steam Workshop
Before you can successfully connect to our ArmA 3 servers you need to download our modpack. If you do not already have any of our mods at all this can take a considerable amount of time as the mods you need to download are considerable in size. If you have played elsewhere with mods before coming to play with us there is a likelyhood you already have some of our mods, in that event we will simply re-use those mods and the download time will be smaller.
Please launch the game at least once normally, through Steam, to ensure that all updates are processed fully. Do this before you continue with this guide or attempt to install any mods, and after all updates to ArmA 3.
Required - Modpack Collection
Install the Modpack/Collection - United Operations - Modpack Collection
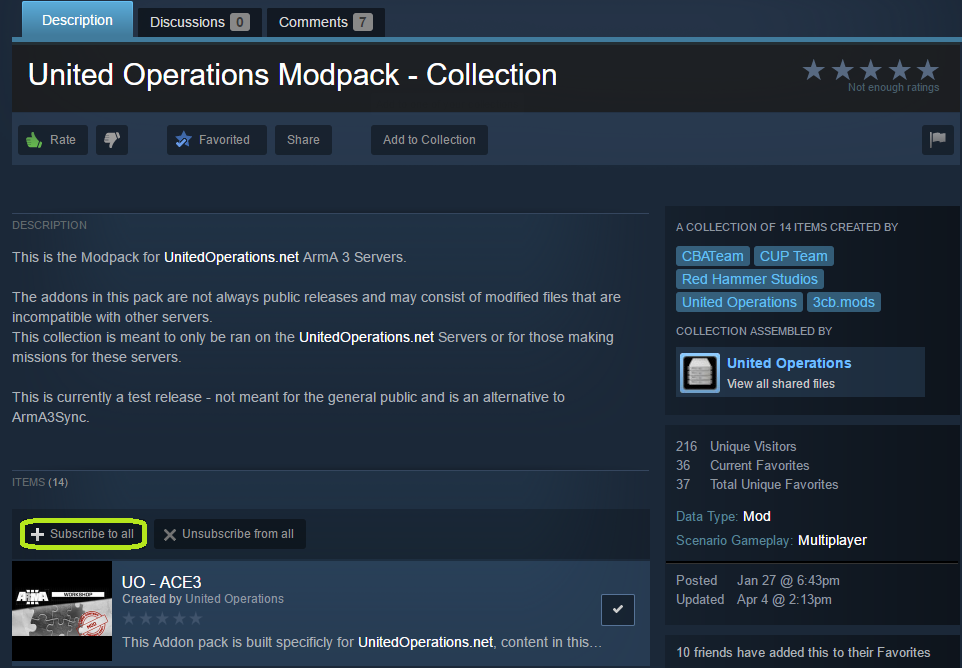
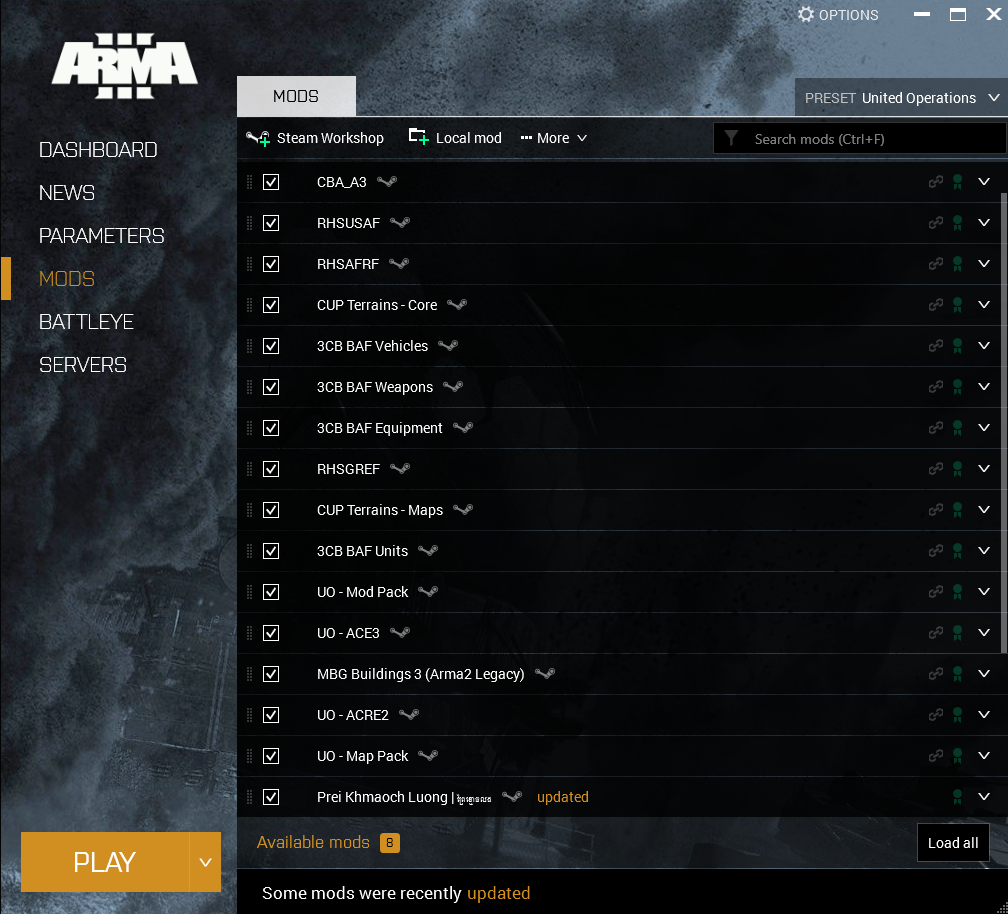
Confirm that The following addons are selected in the ArmA 3 Launcher.
Once Subscribed, the following mods should now appear in your ArmA 3 Launcher - Check-mark all of the following mods.
If these addons are updated, Steam will automatically download these in the background, or when you are connected to Steam.
Optional - Bypassing BattlEye
Due to the development of content in our community, we frequently are running development versions of software. These updates may require BattlEye to be disabled to connect to the server.
If the an update requires BattlEye to be disabled - The Server Channel in Teamspeak will be updated to reflect this requirement.
Normal Server Name - "UnitedOperations.Net - SRV1 - ACE/ACRE2"
Disabled BattlEye Server Name - "UnitedOperations.Net - SRV1 - BE OFF"
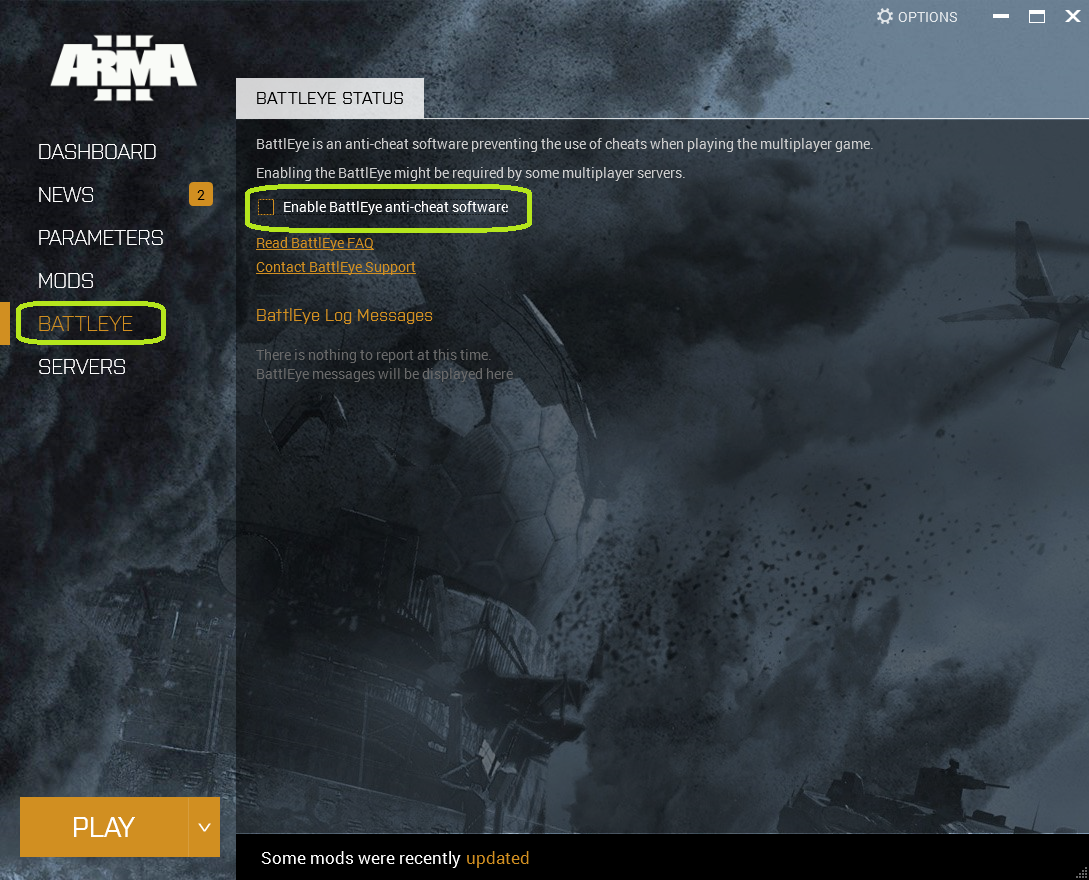
To connect to the servers without BattlEye, select the Battleye Tab in the launcher and uncheck "Enable BattlEye anti-cheat software".
Connecting to the Server - General Info
Server Passwords In order to connect to our servers, you will need to obtain the Server Password - Located Here.
Modpack Install - Updates
Upon the first install of the modpack and or upon updates to the ACRE2 modification.
Close Teamspeak 3
Launch ArmA 3 with the United Operations Moddpack Collection.
ArmA 3 will then install any ACRE2 Updates to Teamspeak 3.
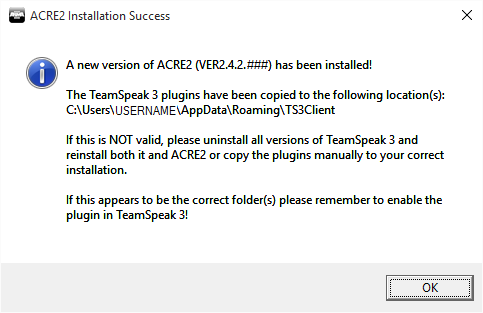
After ACRE2 Updates are installed, you can then reopen Teamspeak 3 and Connect to the server.
Teamspeak 3 - Connect to Server
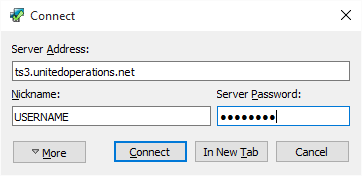
Once you have the passwords from above, Open Teamspeak 3 and select the Connections Menu, then choose Connect. Enter the following information.
- Server Address: ts3.unitedoperations.net
- Nickname: Your Name Here
- Server Password: Server Password - Located Here
Feel free to bookmark the server to save this information.
ArmA 3 - Connect to Server
Once you have the password start ArmA 3, navigate to the Multiplayer server browser, click the tab labeled "Direct Connect" in the tom left-hand corner and enter the following information into the corresponding boxes:
- IP: arma3.unitedoperations.net
- Port: 2402
Then click OK. Then enter the password. You will now be connected to the game server.
ArmA3 - Saving Favorite Servers
One result should appear, save this server as Favorite. After you have played on the server once, it will appear in your recent servers, and you can favorite the server by enabling the gold star infront of the server name. This will cause the server to appear in the ArmA 3 Launcher.
Misc - Help
If the event you cannot find our server using the above method please contact a Regular on our Teamspeak for assistance.
Your First ArmA 3 Session
Joining the Server
The "Primary" or UnitedOperations.Net - SRV1 - ACE/ACRE, is the main ArmA 3 server used for gameplay at United Operations. The server is up 24/7 (aside from occasional technical or administrative issues), and as long as there is room in the mission players are free to join (unless otherwise dictated by a pre-slotted event). For frequent play times please refer to the average play times page. If you are disconnected while attempting to join, verify your mods are setup correctly according to the guide.
If the server is full, you may wish to join the waiting room channel in Teamspeak until a new mission is started, typically players will inform those in the waiting room that a new mission is starting.
Choosing a Slot
If the admin has not pushed to the mission to the briefing or in-game, wait to slot until the current mission leader (usually the player Platoon or Company Commander slot) calls for slots to be filled. The current leader may call specific slots or groups they wish filled. In the case of a Team vs Team mission, the server administrator will typically inform each side how many players they are allotted (in order to maintain the mission maker's intended ratio).
For your first game, you should seek a easier role such as Rifleman, Grenadier, or Automatic Rifleman. This will allow you to become accustomed to our style of play and learn without being in a mission-critical role. The leader of a mission has the final say to any slots and who fills them, and will be enforced by the current admin by kicks/bans in necessary. If there is any confusion to what slot you should fill, feel free to ask.
If the game is already underway and you are joining-in-progress (JIP), choose a slot in a group that ideally has a leader and members, avoid slotting into an empty squad if possible.
Once slotted, ensure you note the player who is slotted into your groups leadership slot (usually a Squad/Section Leader, or Fire-Team Leader). This will be the player immediately in charge of you once in game.
Briefing
The briefing phase is where each side's leader will decide which course of action they will take, and inform the player's on their side to the plan. If the mission is Team vs Team, there is separate teamspeak channels that each side will utilize in order to brief seperetly before joining the SRV1 channel once briefing is complete.
General talk is allowed between players via teamspeak and ingame chat before the leader is ready to brief, but keep in mind the rules regarding conduct on the game server still apply. Once the leader is ready to brief, talking is not allowed unless the player is directly involved in the briefing (i.e. Squad Leaders, Pilots, etc). This is enforced by the admin, and disruptive or uncooperative players will be kicked/banned.
Loading into Mission
Once briefing is complete, all players will move back up to the SRV1 teamspeak channel (if briefing multiple teams). Ensure you are in the correct channel, or ACRE will not function once ingame. Ensure that ArmA is not minimized before loading into game, often times tabbing back into ArmA once ingame will fire the player's weapon by accident.
Once in game, stay in the immediate spawn location in order to facilitate organization. Identify the player from the slotting screen who is your immediate leader (either Squad or Fire-Team Leader) and await their orders. Familiarize yourself with the other players in your group, as this is who you will look for if you become separated during gameplay.
If joining-in-progress, you may be able to teleport to your leader via the action menu (default: Scroll Wheel). If transport vehicles are slotted, await that vehicle to return to spawn to pick up players. Do not take vehicles or assets you are not slotted to operate. If unable to regroup with your group leader, find another group of friendlies to either direct you to your group, or temporarily join theirs.
Blatant disregard for leader's orders and pre-movement organization will be met with warnings or possible kick/ban from the admin. Regulars and players are aware of difficulties new players can have, don't be afraid to ask your leader or fellow group members for help.
Gameplay
Once movement from the initial spawn location has begun, concentrate on staying with your group and listening for orders. Several guides are available in the UOTC Codex section of the wiki where players can learn some of the skills that will be useful on the primary.
Some general etiquette that is helpful to new players includes:
- Use the ACRE volume control (default Tab + Scroll Wheel) to lower your talk volume when contact with enemy is expected. Limit talking to only when necessary to avoid giving away your position.
- Map marking beyond the briefing phase is not allowed on Global and Side channels. If creating marks on the map for your own reference, ensure you are on the Direct or Group channel before making marks.
- Ensure you are not moving in front of other player's lines of fire, and be aware of friendly unit's movements to avoid friendly fire.
- Ask if you are unsure of the current weapon status (Green, Yellow, Red). Ensure if you are "Weapons Yellow" you only engage if fired on first or in immediate danger, to avoid giving away your group's location.
Spectator
If you are killed, do not re-slot into a different slot in order to spawn again unless specifically directed by the admin or Game Moderator (usually due to mission-start mishaps, bugs, or administrative reasons). Those attempting to circumvent this will be subject to ban.
Most missions will put killed players into a spectator screen where they can view the remaining players in the mission. ACRE should automatically separate dead players from live ones and allow them to talk while the mission continues. Ensure that game server rules are maintained, aggressive or immature behavior towards other players will result in removal from the server or possible ban.
Mission End/New Mission Selection
Once the mission is over, the admin will move to the mission selection screen, where players can request new missions at the appropriate player count be played. Mission requests are usually done via in-game chat to avoid players talking over one another. A short post-mission discussion may be allowed by the admin, but the admin may silence discussion in order to facilitate quick selection of the next mission.
It will likely take a few games for you learn the ropes of how we play here at United Operations, keep in mind the server rules and abide by the behavior expectations in the United Operations Charter. Please do not hesitate to ask for help or assistance, and have fun.
Troubleshooting
Having issues installing our modpack? Hop on over to our forums or Discord we'll be happy to help you out.
