ARMs
Contents
Learning objectives
- Know how to use HAD
- Know how to use WPN page
- Know when and how to use POS (EOM, PB, RUK)
- Know when and how to use HAS
HAD
Presents a map, similar to the HSD, but show different emitting radars on it. Lock on a radar and fire.
Biggest issue is co-located radars that overlap. Zooming in can sometimes help, but more often, switch to a HAS shot to surgically target a radar.
WPN Modes
POS
POS will always slave to a selected steerpoint; no steerpoint means no shot in POS mode
- Manually select steerpoints or threat steers in HSD or jump to pre-planned target steerpoints using UFC
- Alternately, set mark points as references to radars to use POS mode
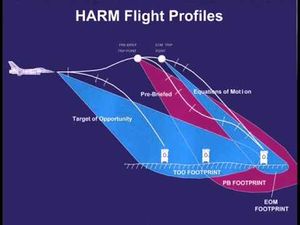
- In POS, you can use EOM (very fine control – you know exactly where the target is and it is on the current steerpoint), PB (wider control – the target is close to a threat steer point), or RUK (extremely wide control – the target is around your current position and will lock on to the first thing it sees). You still need a steerpoint, remember.
- RUK is LOAL, HAS is LOBL.
- RUK, PB, EOM are all three POS modes and all POS modes are steerpoint-directed in azimuth. The difference is in end game seeker activity and assumed range only. EOM and PB assume range = range to steerpoint. RUK assumes range = maximum.
- EOM = point
- PB = area
- RUK = lane
- RUK is for painting a long, wide stripe of ground with HARM coverage. PB is for a floodlight on an area. EOM is a laser pointer.
Tips
If you want to use POS shots, you need a reference steerpoint. If you detect a pop-up SAM, here is how you can set a steerpoint manually so you can still use POS:
- Lock the SAM target up on the FCR.
- Press CZ to zero out the cursor and remove any offset.
- Press ICP 7 (MARK) and make sure DED shows FCR.
- TMS Up to create a markpoint at your cursor.
- Press ICP 0 to automatically go to the steerpoint you just added.
- Select EOM for your POS shot to get the narrowest cone; you locked the target up so you don't need the wide PB cone for your shot.
- Fire when in range.
HAS
HARM as a Sensor allows you to lock onto a radar manually and have the ARM track that signal.
- Switch to WPN
- Switch to HAS
- Cycle tables to the one with the radar you want to track
- Lock up radar with cursor
- Wait until RDY displays
- Put the target in the box on the HUD
- Estimate if range is adequate
- Fire
Weapons
AGM-88 ARM
Standard ARM.
Range: 25nm
AGM-45B Shrike
A Vietnam-era ARM. Low reliability.
Range: 10nm
Tips to use effectively:
- Get to 20,000-30,000 feet
- Switch to WPN->HAS and select proper table
- TMS up on correct SAM Radar
- Wait for a SAM launch
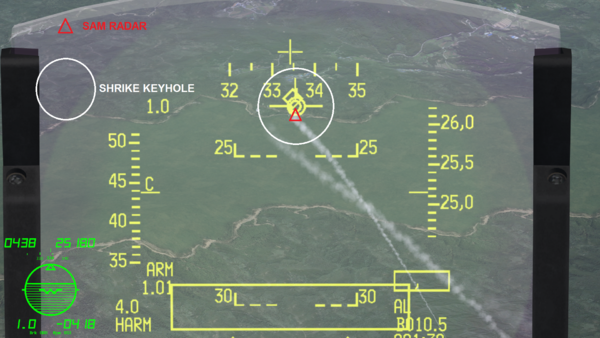
- Aim your FPM at the smoke trail; this will bore-sight your Shrike on the target and is how these weapons were employed historically.
- Fire
- Defend while closing to ensure radar stays on
ALARM
Parachute ARM carried by Tornado and Jaguar.
Range: 24nm
AGM-78 Standard
Old school ARM.
Range: 30nm
{{#invoke:Navbox|navbox}}

