Difference between revisions of "Advanced avionics"
| Line 7: | Line 7: | ||
# TFR | # TFR | ||
# FLIR | # FLIR | ||
| + | <br /> | ||
| − | =Time page and ROLEX= | + | =DED pages= |
| + | ==Time page and ROLEX== | ||
[[File:UFC Time-page.jpg|thumb|right|TIME page]] | [[File:UFC Time-page.jpg|thumb|right|TIME page]] | ||
The TIME page allows the pilot to set a HACK timer and a DELTA TOS for ROLEX calls. The first line gives the current system time. The second line is the hack timer. As the arrows indicate, pressing the ICP NEXT rocker button will start/freeze/resume the timer and ICP PREVIOUS rocker button will reset the hack timer to zero. When the HACK timer is running it is also visible on the CNI page.<br /> | The TIME page allows the pilot to set a HACK timer and a DELTA TOS for ROLEX calls. The first line gives the current system time. The second line is the hack timer. As the arrows indicate, pressing the ICP NEXT rocker button will start/freeze/resume the timer and ICP PREVIOUS rocker button will reset the hack timer to zero. When the HACK timer is running it is also visible on the CNI page.<br /> | ||
| Line 17: | Line 19: | ||
<embedvideo service="youtube">https://www.youtube.com/watch?v=irEEdxfGe-g</embedvideo> | <embedvideo service="youtube">https://www.youtube.com/watch?v=irEEdxfGe-g</embedvideo> | ||
| − | =BINGO page= | + | ==BINGO page== |
[[File:UFC BINGO-page.jpg|thumb|right|TIME page]] | [[File:UFC BINGO-page.jpg|thumb|right|TIME page]] | ||
The BINGO page is where you input your briefed Joker/Bingo settings. It is made up of two lines: the first one is where you enter your Joker or Bingo setting and the second line is the total fuel remaining on board. It is good practice as a mission begins to input the Joker value. You can then reset it to the briefed Bingo value once Joker fuel is reached.<br /> | The BINGO page is where you input your briefed Joker/Bingo settings. It is made up of two lines: the first one is where you enter your Joker or Bingo setting and the second line is the total fuel remaining on board. It is good practice as a mission begins to input the Joker value. You can then reset it to the briefed Bingo value once Joker fuel is reached.<br /> | ||
| Line 29: | Line 31: | ||
[[File:BMS FUEL chart.jpg||none|450px|left|]]<br /> | [[File:BMS FUEL chart.jpg||none|450px|left|]]<br /> | ||
| − | =STPT page= | + | ==STPT page== |
| + | [[File:UFC STPT-page.png|thumb|right|STPT page]] | ||
The Steerpoint page gives the pilot information about the INS steerpoint.<br /> | The Steerpoint page gives the pilot information about the INS steerpoint.<br /> | ||
| − | |||
:*The first line allows the pilots to toggle the active steerpoint with the NEXT/PREV ICP buttons (notice the up & down arrows) and the MAN or AUTO steerpoint function, which can be toggled with DCS SEQ. MAN means that the new steerpoint has to be manually selected. AUTO will increment to the next steerpoint automatically when the INS detects the proximity of the current waypoint. In AUTO mode an “A” symbol is displayed on the CNI page next to the steerpoint. | :*The first line allows the pilots to toggle the active steerpoint with the NEXT/PREV ICP buttons (notice the up & down arrows) and the MAN or AUTO steerpoint function, which can be toggled with DCS SEQ. MAN means that the new steerpoint has to be manually selected. AUTO will increment to the next steerpoint automatically when the INS detects the proximity of the current waypoint. In AUTO mode an “A” symbol is displayed on the CNI page next to the steerpoint. | ||
:*The second line is the LATITUDE of the currently selected steerpoint. Placing the scratchpad there will let the pilot enter the latitude for this particular navigation point. | :*The second line is the LATITUDE of the currently selected steerpoint. Placing the scratchpad there will let the pilot enter the latitude for this particular navigation point. | ||
| Line 37: | Line 39: | ||
:*The fourth line is the elevation of the steerpoint (the altitude at which you are supposed to overfly the steerpoint according to your INS flight plan). This is different from the real jet that has the ground spot height for steerpoint in this field (it is quite relevant to TGP mechanisation and finding the target). | :*The fourth line is the elevation of the steerpoint (the altitude at which you are supposed to overfly the steerpoint according to your INS flight plan). This is different from the real jet that has the ground spot height for steerpoint in this field (it is quite relevant to TGP mechanisation and finding the target). | ||
:*The fifth line is the TOS (Time Over Steerpoint) which gives you the local time the steerpoint will be reached, if you are following the route of flight as planned. | :*The fifth line is the TOS (Time Over Steerpoint) which gives you the local time the steerpoint will be reached, if you are following the route of flight as planned. | ||
| + | |||
| + | ==MARK page== | ||
| + | [[File:UFC MARK-page.png|thumb|right|MARK page]] | ||
| + | The MARK page is used to create markpoints. Ownship markpoints are stored in steerpoints 26-30.(Once #30 is filled, the next markpoint will overwrite #26 and so on)<br /> | ||
| + | Markpoints can be made from 4 different systems: | ||
| + | :*OFLY (Overfly GPS/INS) | ||
| + | :*FCR (Fire Control Radar) | ||
| + | :*HUD (Head Up Display) | ||
| + | :*TGP (Targeting Pod). | ||
| + | There are thus 4 submodes in the MARK page. To toggle between the submodes use DCS SEQ. The system defaults to a specific subpage according to master mode and Sensor of Interest (SOI) and may enable automatic markpoint recording (automatic markpoint are only made in the Air to Air mode)<br /> | ||
| + | Markpoints are created with TMS forward (TMS up) and are visible on the HSD page once created as a cyan cross.<br /> | ||
| + | |||
[[Category:UOAF]] | [[Category:UOAF]] | ||
[[Category:UOAF: BMS Codex]] | [[Category:UOAF: BMS Codex]] | ||
Revision as of 21:06, 17 March 2017
Contents
Learning objectives
- CRUS page
- Time page and ROLEX
- BINGO page
- STPT page
- MARK page
- TFR
- FLIR
DED pages
Time page and ROLEX
The TIME page allows the pilot to set a HACK timer and a DELTA TOS for ROLEX calls. The first line gives the current system time. The second line is the hack timer. As the arrows indicate, pressing the ICP NEXT rocker button will start/freeze/resume the timer and ICP PREVIOUS rocker button will reset the hack timer to zero. When the HACK timer is running it is also visible on the CNI page.
ROLEX calls are initiated when TOS for all steerpoints need to be adjusted. This is done through the TIME page by changing the DELTA TOS. Place the scratchpad on the DELTA TOS line and input the ROLEX value. If a minus is required start your input with the 0 (zero) ICP key for the minus sign.
- For instance: “Mamba flight Rolex +2” => TIME, DCS down to DELTA TOS: 2, 0, 0, ENTR
- Another example: “Mamba flight Rolex -3” => TIME, DCS down to DELTA TOS: 0, 3, 0, 0, ENTR
BINGO page
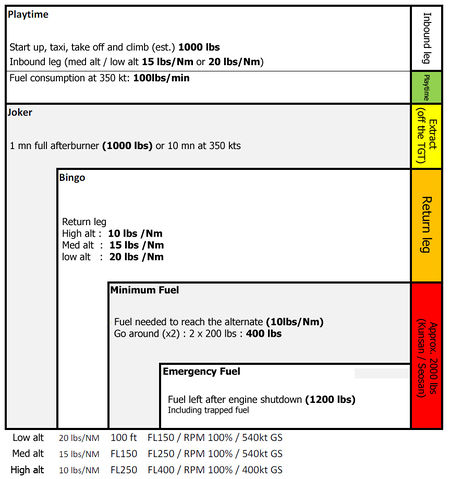
The BINGO page is where you input your briefed Joker/Bingo settings. It is made up of two lines: the first one is where you enter your Joker or Bingo setting and the second line is the total fuel remaining on board. It is good practice as a mission begins to input the Joker value. You can then reset it to the briefed Bingo value once Joker fuel is reached.
Assuming those fuel consumption :
- Low alt = 20 lbs/Nm - 100 ft to FL150 / RPM 100% / 540 kts GS
- Med alt = 15 lbs/Nm - FL150 to FL250 / RPM 100% / 540 kts GS
- Hgh alt = 10 lbs/Nm - FL250 to FL400 / RPM 100% / 400 kts GS
Here is a quick way to calculate your BINGO :
- (return leg * consumption) + (diverted leg * consumption) + normal recovery fuel (F-16 MLU ,block 10, 15, 20, 25, 30 and 32 = 1000 lbs / F-16 block 40 to 52 = 1200 lbs) + two landing trials (400 lbs).
The JOKER is usually set to BINGO + 1000 lbs which correspond to 1 mn of afterburner or 10 mn of flight time at 350 kts.
STPT page
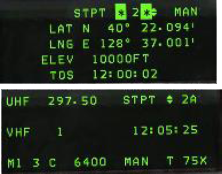
The Steerpoint page gives the pilot information about the INS steerpoint.
- The first line allows the pilots to toggle the active steerpoint with the NEXT/PREV ICP buttons (notice the up & down arrows) and the MAN or AUTO steerpoint function, which can be toggled with DCS SEQ. MAN means that the new steerpoint has to be manually selected. AUTO will increment to the next steerpoint automatically when the INS detects the proximity of the current waypoint. In AUTO mode an “A” symbol is displayed on the CNI page next to the steerpoint.
- The second line is the LATITUDE of the currently selected steerpoint. Placing the scratchpad there will let the pilot enter the latitude for this particular navigation point.
- The third line is the LONGITUDE of the selected steerpoint. It can also be changed by placing the scratchpad accordingly and entering new coordinates.
- The fourth line is the elevation of the steerpoint (the altitude at which you are supposed to overfly the steerpoint according to your INS flight plan). This is different from the real jet that has the ground spot height for steerpoint in this field (it is quite relevant to TGP mechanisation and finding the target).
- The fifth line is the TOS (Time Over Steerpoint) which gives you the local time the steerpoint will be reached, if you are following the route of flight as planned.
MARK page
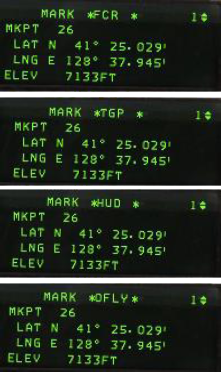
The MARK page is used to create markpoints. Ownship markpoints are stored in steerpoints 26-30.(Once #30 is filled, the next markpoint will overwrite #26 and so on)
Markpoints can be made from 4 different systems:
- OFLY (Overfly GPS/INS)
- FCR (Fire Control Radar)
- HUD (Head Up Display)
- TGP (Targeting Pod).
There are thus 4 submodes in the MARK page. To toggle between the submodes use DCS SEQ. The system defaults to a specific subpage according to master mode and Sensor of Interest (SOI) and may enable automatic markpoint recording (automatic markpoint are only made in the Air to Air mode)
Markpoints are created with TMS forward (TMS up) and are visible on the HSD page once created as a cyan cross.


