Difference between revisions of "Air-to-air radar"
| Line 50: | Line 50: | ||
==ACM (air combat mode)== | ==ACM (air combat mode)== | ||
It's actually a series of sub-modes dedicated to dogfigthing. All modes will automatically lock onto the first available target they spot, although the various sub-modes will change how the radar searches for the target. If you are using any ACM mode for BVR engagements, you might as well fly with your radar off. | It's actually a series of sub-modes dedicated to dogfigthing. All modes will automatically lock onto the first available target they spot, although the various sub-modes will change how the radar searches for the target. If you are using any ACM mode for BVR engagements, you might as well fly with your radar off. | ||
| + | =Quick tips= | ||
| + | ==FCR== | ||
| + | #Information | ||
| + | #top left-range | ||
| + | #Bottom number “bulleyes” target-radar cursor | ||
| + | #Blue line+numbers are alt scanning. Change F6+F7 | ||
| + | ==Buttons== | ||
| + | #RWS/TWS-radar modes | ||
| + | ==Scan modes== | ||
| + | #RWS-Fast rate + more cone area | ||
| + | #TWS-More situational awarness | ||
| + | ==Symbols== | ||
| + | #Blue vert-radar currently scanning | ||
| + | #White squares-contacts | ||
| + | #white line-nose of aircraft | ||
| + | ==Numbers== | ||
| + | #top right- Closure rate in knots | ||
| + | #Left of that is target airspeed | ||
| + | #all way to left is heading of target | ||
{{Nav UOAF}} | {{Nav UOAF}} | ||
Revision as of 23:55, 19 March 2017
Contents
Learning objectives
- Understand how a b-scope works
- Understand RWS and TWS mode
- Understand ACM
- Zoom with EXP
- Know how to identify targets, including range, altitude, speed and aspect
- Know how to adjust altitude scan
- Understand the different bar scans
- Understand how to change azimuth width
- Know how to use spotlight scan
- Understand the Collision Antenna Train Angle (CATA) cross
- Sorting targets
Learning files
B-Scope
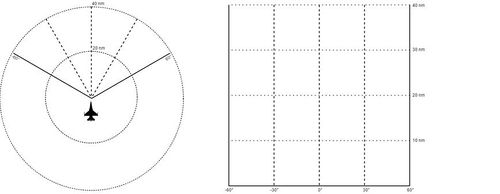
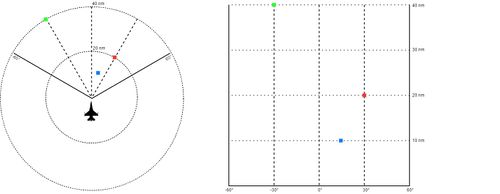
The B-scope presents your cone-shaped radar search into a square-shaped display on the FCR by stretching the bottom out to the corners.
Here you can see three contacts. On the B-Scope, they look like they are to your front and offset significantly, but in real life, they are not as wide as you are led to believe, especially at close ranges.
A B-Scope takes radius and azimuth information (usually plotted out on a polar coordinate system) and projects it on to a Cartesian plane. The x-axis represents the azimuth, and the y-axis represents the radius (distance). Areas that are closer to the aircraft become greatly stretched as a side effect.
Although the stretch can be disorientating at first, it can provide several several advantages over the pie-scope. Take for an example a situation where four contacts are located 10 nm away at azimuths -7.5, -5, -2.5, and 0 with the FCR scale set at 40nm. On a traditional pie-scope, the contacts will be grouped closely to each other on screen. This could make it more difficult to use the cursor to sort targets when the dots are located very close to each other. The stretch that the B-Scope provides at close range makes it easier to identify and sort targets with the cursor.
Radar Modes
So, what radar mode should you use?
You should stick to TWS unless engaged in a dogfight. You can use RWS to find targets and then switching between TWS and RWS to occasionally see what the targets are doing and then back to the wider scan area provided by RWS without having to bother modifying the radar antenna too much.
RWS (range while scanning)
Default radar mode, can scan a large area, hence requiring less antenna tilting. Doesn't provide much information other than range of the targets, unless locked-on, in which it will provide the most information, but also warn the target that he is being targeted and the radar won't scan for other targets. Required to use the AIM-7.
LRS (long-range scanning)
Exactly like RWS, only that the radar takes a bit more time when sweeping, thus increasing the chances of detecting a contact at longer ranges. Scans the same large area as RWS.
TWS (track-while-scanning)
Upside, it gives you a lot of information about up to 16 targets, while also showing where they are pointed and allows you to engage with an AMRAAM without the target RWR going crazy. Downsides are that it can only track 16 contacts at a time, doesn't scan nearly the same volume of space as RWS and it doesn't provide the same amount of information RWS provides for a single target.
VSR
Don't bother
RWS-SAM
A sub-mode of RWS, it can be thought of as a compromise between RWS and TWS, in that it provides more information about a locked target than TWS, but doesn't provide nearly as much information about other targets
ACM (air combat mode)
It's actually a series of sub-modes dedicated to dogfigthing. All modes will automatically lock onto the first available target they spot, although the various sub-modes will change how the radar searches for the target. If you are using any ACM mode for BVR engagements, you might as well fly with your radar off.
Quick tips
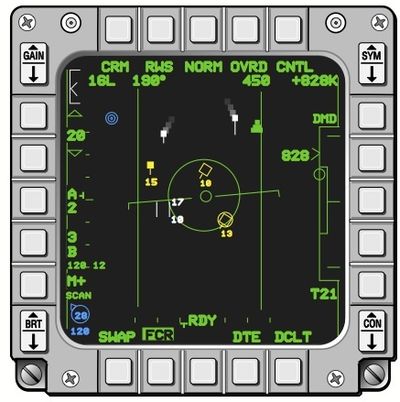
FCR
- Information
- top left-range
- Bottom number “bulleyes” target-radar cursor
- Blue line+numbers are alt scanning. Change F6+F7
Buttons
- RWS/TWS-radar modes
Scan modes
- RWS-Fast rate + more cone area
- TWS-More situational awarness
Symbols
- Blue vert-radar currently scanning
- White squares-contacts
- white line-nose of aircraft
Numbers
- top right- Closure rate in knots
- Left of that is target airspeed
- all way to left is heading of target
{{#invoke:Navbox|navbox}}


