Emergency procedures
In BMS there are no random failures of your jet. This is a good thing. The bad thing is there is a complex system of inter-related faults and problems that can arise when you either A: get shot, or B: do something stupid.
Learning objectives
- Learn how to recognize faults
- Know how to avoid faults
- Recover from stalls
- Use an emergency checklist
Learning files
- BMS 4.33 Dash 1 SECTION III (p168)
- BMS-Training.pdf mission 7 (p62) and mission 9 (p78)
- F-16 Loss of Control, Test Pilot on Yaw Departure
Emergency situations
The most common problems caused by battle damage will be loss of one or more navigation systems, or damage that reduces the capability of your engine. You should familiarise yourself with the various backup systems available, not only in the jet but on the ground in terms of TACAN frequencies, alternative landing fields etc.
There are 3 basic rules to be followed in any in-flight emergency:
- Maintain aircraft control
- Find out what is wrong
- Land as soon as the situation dictates
This can happen on ingress to a mission and mean you will need to abort. This is a tough call but there’s no point in nursing a half dead aircraft into a situation where you can’t effectively defend yourself or your partner. You should RTB as soon as possible. You should not RTB alone, your wingman will accompany you and keep an eye on you.
Loss of controlled flight
This is actually very hard to do in an F-16 due to the Fly by wire system at the heart of the aircraft. It is possible to get into a DEEP STALL. In this state the FBW system is actually fighting against you and you will need to override it to survive.
Your documents folder in Falcon BMS contains not only the manuals for the jet which you should study but also several checklists. These should be available to you at all times and you should refer to them whenever needed. The following procedures are based on those checklists.
CONTROLS release
THROTTLE MIL if in Afterburner
If you are inverted:
RUDDER Opposite yaw direction
If still out of control:
MPO Switch (keypad o) OVRD and hold it
STICK Cycle in Phase
Cycle in Phase means when the plane pitches down, move the stick forward and when the jet pitches up, move the stick back. Imagine you are trying to rock the plane off a ledge.
You will hopefully come out of the stall and slowly gather airspeed and control. You will have to pitch down to accelerate and you may need more than 6000ft to achieve this. Be aware of your altitude and be prepared to eject if you're too low. Do NOT release the MPO switch until you are confident that the Jet has recovered.
The F-18 in BMS is not covered here but you should familiarize yourself with it's performance envelope as it stalls much more readily than the F-16 if abused.
Systems
The warning/caution system is made of different subsystems:
- Warning lights (amber lights on the eyebrows)
- MASTER CAUTION (press to reset amber light on the left eyebrow)
- Caution lights (yellow lights on the right auxiliary console caution panel)
- PFLD (Pilot Fault List Display - small screen on the right auxiliary console accessed with the F-ACK button on the left eyebrow)
- Maintenance Fault List
- VMS (Voice Message System – aka Bitching Betty)
- HUD messages
The Master caution light will come on to alert you to a condition. It means: look at your caution panel now. Do not just press the Master caution light, it will not clear the fault.
The subject of Emergency procedures is huge and the pilot should work through the material provided with the sim to gain a proper understanding. I will attempt to cover the most common problems you will encounter and explain how they can be dealt with.
Exceeding g-limits or airspeed for stores
The things you hang off your jet will have an effect on it’s performance. You will not be able to achieve full speed and the G’s you can pull will be limited. A light load of Air to Air weapons will not have much effect, but an aircraft loaded to the max with bombs will be noticeably limited.
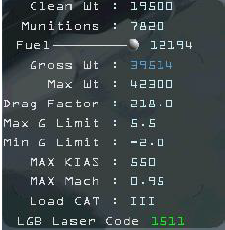
Before the mission you should refer to the bottom right of your loadout screen
and note the Max and Min G limit and the Max and Min IAS (indicated airspeed) and Mach.
If you exceed these limits it’s likely that you will break something your bomb fuzes may fail, or your pylon stations may pack in and you will not be able to use your ordnance. In the sim you will hear ominous groaning sounds if you go too fast or pull too many g’s. Note that the negative G number in particular is very small. Be especially careful when flying NOE or “bunting” the nose down as it doesn't take much to break something.
Actions on hearing the dreaded graunching sound or on suspected over-g/speed:
Look at the PFLD. Any stations that are damaged will be listed there. There are 9 available stations, the display will say either SMS STAx DEGR or SMS STAx FAIL. You must cross reference with your SMS page on the MFD and work out what’s hanging on the damaged station. If it’s your bombs, then there’s a good chance they won’t come off or won’t go bang.
You could consider flying as escort for the rest of your package or RTB. If it’s your A/A stores you need to think about your survivability in an engagement. Either way, inform your flight lead immediately so they can come up with a plan.
If you are hit or take a near miss from AAA or a SAM you may suffer one or more of the following:
Engine damage
You will not develop full power, your reheat may not work and you may put out large amounts of black smoke. If this happens
Check that you are not on fire! Observe the warning lights and Master Caution, Ask your partner for a visual check.
In BMS if you are on fire, it’s time to eject.
If you’re not on fire jettison external stores and head for home. You should try and gain altitude if practical in order to prepare for the next possibility, which is:
Engine failure in flight
It is possible to restart your engine in flight. The procedure differs slightly depending on engine RPM.
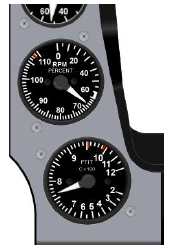
If RPM is 25-50% AND FTIT (Fan Turbine Inlet Temp.) is below 700c
Simply reduce throttle to IDLE
Toggle the Idle detent* (ALT-i)
Advance throttle to around half-way.
Check RPM increasing.
If RPM is below 20% AND FTIT (Fan Turbine Inlet Temp.) is below 700c
Move throttle to IDLE
Ensure you are below 20000 feet and slower than 400 Knots IAS
Move the JFS Switch to START2
Watch for an RPM rise
Toggle the Idle detent* (ALT-i)
Check RPM increasing
Depending on your throttle hardware you may have an idle detent built in. If this is the case you don’t need the shortcut. In either case:
If your engine responds normally, continue. If not, prepare for the next possibility which is:
Flameout Landing
BMS-Training.pdf Mission 7 covers this scenario. You should train for it or when it happens you will almost definitely crash.
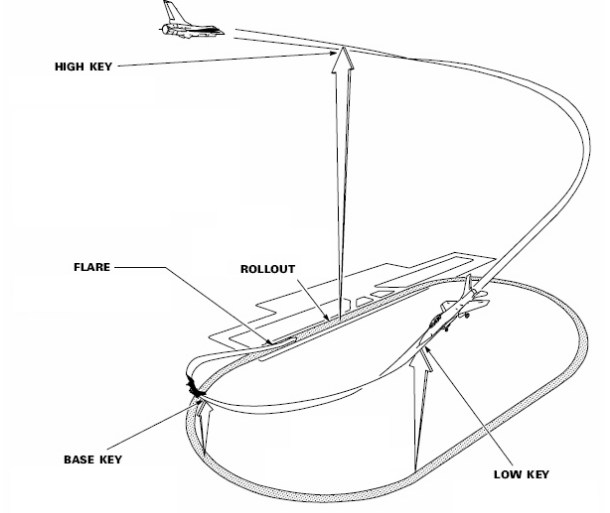
The overhead flameout approach is made up of three distinctive points called HIGH KEY, LOW KEY and BASE KEY. Each key is associated with a minimum altitude, ensuring that the flameout approach can be concluded with a safe landing. The pattern can be entered at any point provided the next key altitude can be reached.
HIGH KEY: 1/3 down the landing runway at 7000 – 10000 feet.
LOW KEY: abeam rollout point on final at 3000 – 5000 feet.
BASE KEY: midpoint of the turn from downwind to final no lower than 2000 AGL.
You should fly your jet at an AOA of 6 degrees. This will ensure you are at the correct glide speed for your configuration. Be careful not to exceed 50 degrees bank with gear up and 55 degrees with gear down or you will drop like a greased stone.
Once again, refer to your Emergency Checklist to survive this situation.
Check PFD, If you’re on fire EJECT
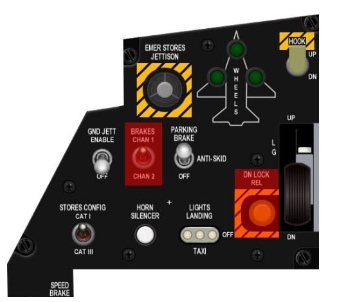
Stores JETTISON
EPU Switch ON
Air source knob RAM
Glide AOA 6 Degrees
Radio TWR Declare emergency
Gear Down
ALT Gear Pull if required
FLARE reduce to 160 knots at touchdown
Brake straight ahead and do not turn off the runway. If your engine is out, you will have limited stopping and steering. It would be uncool to crash AFTER you had successfully landed.
Radio failure
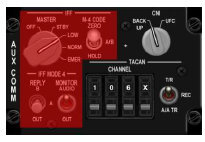
As well as the normal radios in your F-16 there is a backup system. The CNI knob is located on the AUX COMM Panel and toggles between the Up Front Controller ( the ICP, DED and MFD’s) and the BACKUP radio’s.
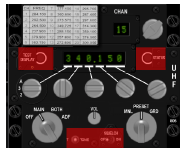
In the BACKUP position you can tune to a TACAN manually and Tune your UHF radio. You also have Backup IFF but Hellhound would have to kill you if it worked. Note that all VHF frequencies in BMS have a UHF equivalent. If your VHF radio is out you can still communicate on UHF. It is wise to know the tower frequency and the UHF 17 frequency in use. (currently UHF 17 is 359.300 Mhz) You can tune the Backup UHF radio on the Backup UHF Panel.
The MNL PRESET GRD switch controls how the frequency is determined. In BMS the PRESETs are fixed and may not correspond to the Data Cartridge freq. It is better to switch to MNL and use the rotary knobs above to input a discrete frequency.
You can transmit on the UHF Guard frequency by putting the MNL PRESET GRD switch to GRD.
Using the system mentioned above, you can also tune a TACAN channel using the controls on the AUX COMM Panel when the CNI knob is in BACKUP. You can navigate using the HSI Between your legs if using TACAN.
HUD failure
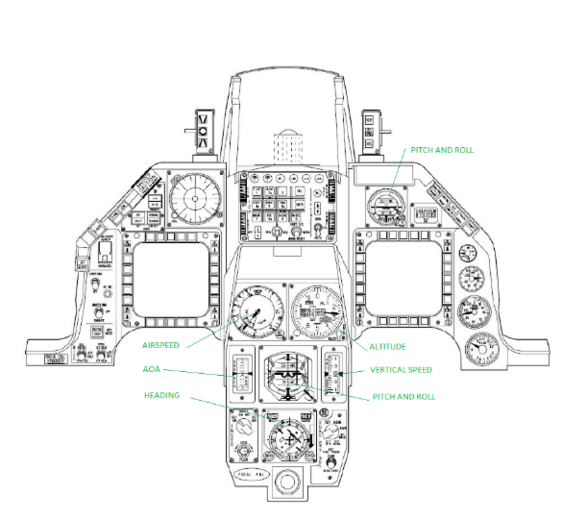
The HUD, or Heads up display offers a huge amount of information depending on the Master mode selected at any one time. It’s a vital aid for navigation. However if you lose the HUD you are not dead yet.
Most HUD information is mirrored elsewhere in your Jet. Practice turning the HUD off and get used to flying on these instruments.
Gear failure
Your gear position is indicated by the GEAR POSITION INDICATOR (Duh)
When your gear is down you’ll have 3 green lights. When the gear is in transit, OR HAS FAILED TO LOCK IN POSITION there is a red warning light in the Gear handle. Should your gear fail, there’s a checklist for that!
LG Handle DOWN
Airspeed 190 MAX (IF POSS)
Alt Gear Handle PULL
If gear indicates SAFE (3 GREENS) LAND NORMALLY
If gear not safe PREPARE FOR GEAR UP LANDING
In reality you could try to shake the gear loose by rocking the jet but this isn’t modelled in BMS.
Also the Alt Gear system use hydraulic pressure system B and so does the Nose Wheel Steering. Don’t count on being able to steer if you do land other than limited differential braking.
Landing with Gear up or unsafe
From the checklist:
Consider ejecting
Retain empty fuel tanks and racks (forms a cushion)
Armament Jettison (prevents big explosions)
TANK Inerting switch Tank Inerting (reduces pressure in the fuel system)
AIR REFUEL SW. O pen (reduces pressure in the fuel system)
FCR off (reduces radiation risk)
ST STA/ HDPT/ECM power off (reduces electrical fire risk)
Land gently at a relatively flat attitude and pray.
The above is just a distillation of a very complex subject. Emergencies should be trained for and anticipated. The BMS Training Missions and Checklists should be studied. It’s a good feeling to shack the target and come home, but If you beat the odds and RTB in a bent jet through calm and considered actions you will feel 100 times better. Refer to this story on the UOAF Forum. Notice that procedures were followed and teamwork was used. Professionalism and teamwork meant that that pilot lived to fight on.
Hoo-aah as I believe the Americans say :-)
{{#invoke:Navbox|navbox}}
