Difference between revisions of "F14"
m |
m |
||
| Line 105: | Line 105: | ||
====TID==== | ====TID==== | ||
| − | [[File:F14TID.jpg|frameless| | + | [[File:F14TID.jpg|frameless|right|788x788px]] |
| − | This is one of the AWG-9's radar displays. This | + | This is one of the AWG-9's radar displays. This screen will be the one you use the most as the RIO as it provides the largest picture of the battlespace. The scale of the page is set by a control nob near the HCU (Hand Control Unit) that we will look at more latter. On the screen the dashed lines extending out from your ownship symbol are the radar scan azimuth limits. Each dash is exactly 20NMi's long and will scale to you current range setting. Currently at the top it is displaying the INS's ownship coordinates. |
| + | --- | ||
| + | Target Data: | ||
| + | First we we will briefly cover how the TID displays target data. | ||
| + | Ownship contacts: | ||
| + | Each procseed contact will appear as a dot with a HAFU (identification) symbol above and/or below them, if the RIO is in either TWS or RWS this display is used to show processed radar contacts, Datalink contacts, and navigation. | ||
| + | Datalink contacts: | ||
| + | |||
| + | You can manually set a contacts HAFU with the D/L page in the CAP. | ||
| + | |||
| + | Radar scan volume: | ||
| + | The elevation is shown on the right screen, keep in mind the scan elevation show in this area is at your current max range and not wherever your TID cursor is or selected object. | ||
''TOP LINE - Upper elevation limit at current max range'' | ''TOP LINE - Upper elevation limit at current max range'' | ||
| Line 115: | Line 126: | ||
''LOWER - Lower elevation limit at current max range.'' | ''LOWER - Lower elevation limit at current max range.'' | ||
| + | The azimuth is represented by the dashed range lines, they will move left and right to show the current scan volume in azimuth. | ||
| − | |||
| + | http://www.heatblur.se/F-14Manual/general.html#tid-symbology | ||
---- | ---- | ||
Revision as of 22:53, 10 February 2020
DCS F-14 A/A introductory Guide
Introduction
The F14 is a heavy US naval fighter designed for the intercept role but can act as an air superiority fighter engaging enemy fighters.
- Weapons
- AIM54
- AIM7
- AIM9
- Pilot Seat
- Keybinds
- Viewing the radar
- HUD/ACM - important elements
Weapons
AIM-54
The AIM-54 will be the most used A/A weapon for the F14 and is unique to this aircraft. It is a long range actively guided A/A missile. It was originally meant to be deployed on the F111B to intercept bombers and cruise missiles at very long range. Additionally, learning from the Vietnam conflict, the missile also had to be able to engage maneuverable fighter aircraft at medium ranges with high hit rates. This led to a missile which in testing achieved a max range shot of ~115nm and was the first missile to hit a target pulling more than 6g's successfully.
(note this next part is WIP as of 7/14/2019 as we are waiting for HB to get access to a working missile API but once they do the AIM-54 will behave as described in the following text. Until then it acts essentially like an AMRAAM)
Due to the more antiquated nature of its electronics the 54 does have downsides to its deployment. First, it is not truly fire and forget in TWS mode like the AMRAAM is. The computer has to tell the missile to go active via a RF pulse sent through the missiles datalink. This is often commanded 16sec before impact. Tactically speaking this means a turn too far away from the target will result in the missile not receiving the pitbull command. This can be averted if the pilot flips up the ACM cover (missile is active off the rail) or if the RIO manually gives the command via a switch in the back.
On the other hand when using STT the missile will go into a SARH mode. While operating in SARH mode if the STT lock is lost the missile will not turn on its own radar until the pitbull command is received. However if the STT lock is re-acquired the missile will continue to guide until it goes active. Additionally, while in a Pulse STT lock the missile will not be able to loft and will not receive the range befit this provides.
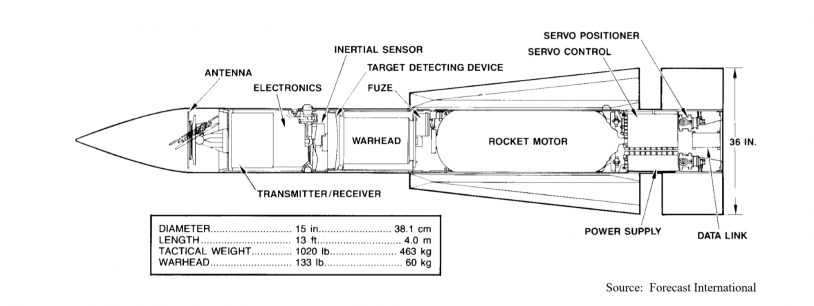
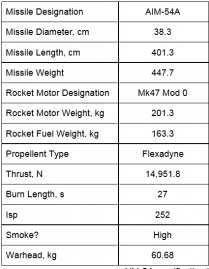
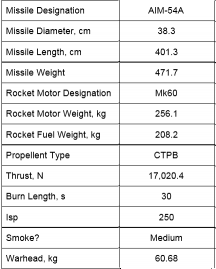
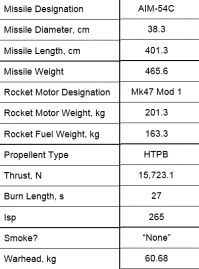
There are 3 main types of AIM-54:
| A-47 | A-60 | C-47 |
*From HB http://media.heatblur.se/AIM-54.pdf
AIM-7
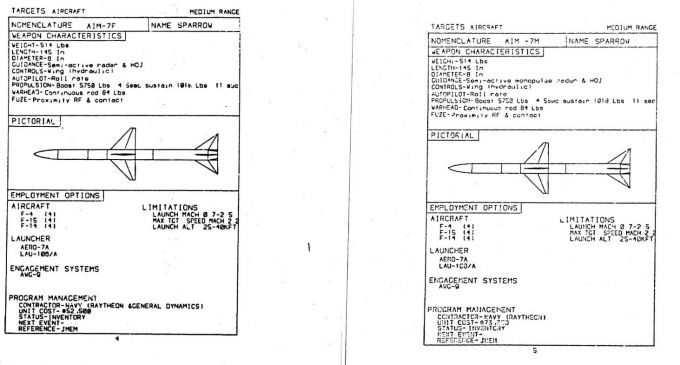
The Sparrow III is the third major revision of the venerable sparrow design of the early 1950's. It was the frontline BVR A/A missile for the United States Airforce, Marine Core, and Navy until the early to mid 1990's; ultimately being replaced by the AIM-120 series of missiles. The sparrow III, when compared to its predecessors, is a significant improvement in every way, it features a design that was easily upgradable over time. The ultimate version we have in DCS the MH variant features lofting logic and improved CCM performance over previous models.
F
The first Sparrow variant fielded of the new type the F sets the aerodynamics and range for all futures sparrows. Unique to this variant is the ability to home in on either a CW signal or a PD signal. Even though not implemented on the F14 yet, in the future you should be able to choose between the two modes. This in game means all three types of sparrow perform kinematically the same, however the F's chaff resistance is extremely low and can be decoyed with only a few chaff bundles.
M
The upgrade to the F-model, the M build irl received a new, and substantially better, monopulse seeker and a chose between two nose cones. One optimized for radar performance the other for aerodynamic performance. The monopulse seeker gives this missiles an inherent resistance to chaff and ECM in addition it can only home in on a PD signal. In game the only difference from the F is a substantially improved chaff resistance.
MH
The MH variant is the most modern sparrow currently in DCS. This variant uses parts from the AIM-7P to improve its long range performance with lofting and low altitude performance with newer guidance computers. Additionally the CCM logic was upgraded substantially. In game this makes the MH the most effective variant due to its lofting and CCM performance making chaff have a low effectiveness against it.
AIM-9
The Sidewinder is the longest serving missile series in the world. It has seen massive improvements over the more than 50 years it has been in service. The F14 can currently carry two types the AIM-9L and the AIM-9M
L
The '9L' was the first of the "unified" Sidewinder models, as previously the Airforce and Navy had their own unique model, this one was the first to be used by both branches. The L was a major upgrade over all previous sidewinders, heavily based on the AIM-9H the ultimate navy only variant. The L featured a new cooled InSb (Indium Antimonide) FM spin seeker which provides some natural resistance to IR counter measures, a completely new electronics package, increased off boresight capabilities, higher max G, higher launch g (7g's), much longer flight time of 1 minute, New warhead, new and more powerful motor.
M
The '9M' in shape, size, weight, and even appearance is the same missile. But on the inside its electronics got completely overhauled. These new electronics could now filter out flares based on a flares energy rise time.
and it also proved for more background noise filtering. In addition to this the 9M got a new smokeless motor that almost completely removed the smoke signature of the missile.
RIO Seat
Controls:
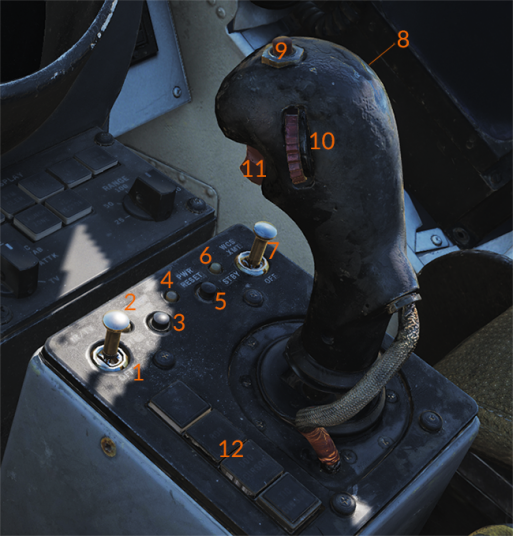
HCU:
- IR/TV switch - Turns on and off the IR/TV camera on the bottom of the nose of the aircraft
- IR/TV overtemp - Lights up if camera is overheating and needs to be shut down
- Light Test - Tests all lights needed for controlling the AWG-9
- PWR Reset - Indicates Power Reset is in progress
- PWR Reset button - Resets secondary power supplies.
- WCS Indicator - "Light indicating selection of STBY or XMT with the radar not yet timed out or selection of XMT with radar transmission remaining off."
- WCS Switch
- Down - Off
- Middle - STBY/Warmup
- Up - Active mode
- MRL - Manual rapid lock on mode
- OFFSET - Offsets display to hooked location on the TID
- ELEV thumbwheel - Fine tuning of radar elevation in range ±4°'s
- HCU trigger
- Half press - Half action (Home) - used to allow slewing of TID selection cursor and DDD selection cursor
- Full Press - Full action (PgUp) - Used to select a target or object on the TID and engage a lock with the DDD.
- Operating mode buttons, in order from top to bottom:
- IR/TV HCU takes manual control of IR/TV camera slew and elevation control
- RDR - HCU takes control of the radar antenna azimuth and elevation to perform lock on using the DDD in PD, Pulse, or RWS.
- DDD Cursor - Used to mark a geographical location in Pulse mode for a NAV system update or to mark ships on the DDD
- TID Cursor - HCU takes control of the TID cursor allowing it to 'hook' targets for either lock on (TWS) or moving of waypoints/creation of waypoints
Displays:
TID
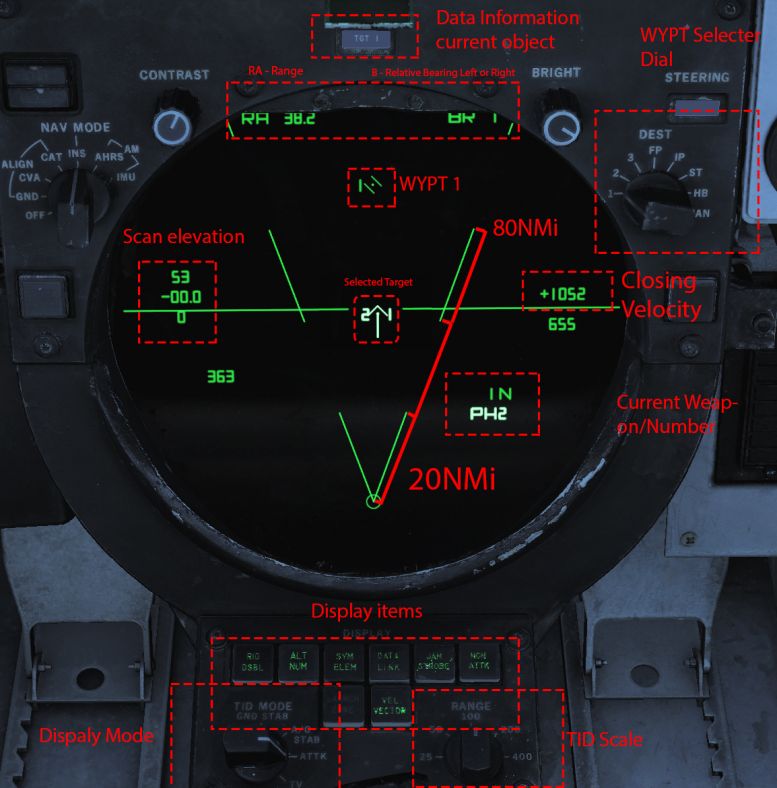
This is one of the AWG-9's radar displays. This screen will be the one you use the most as the RIO as it provides the largest picture of the battlespace. The scale of the page is set by a control nob near the HCU (Hand Control Unit) that we will look at more latter. On the screen the dashed lines extending out from your ownship symbol are the radar scan azimuth limits. Each dash is exactly 20NMi's long and will scale to you current range setting. Currently at the top it is displaying the INS's ownship coordinates. --- Target Data: First we we will briefly cover how the TID displays target data.
Ownship contacts:
Each procseed contact will appear as a dot with a HAFU (identification) symbol above and/or below them, if the RIO is in either TWS or RWS this display is used to show processed radar contacts, Datalink contacts, and navigation. Datalink contacts:
You can manually set a contacts HAFU with the D/L page in the CAP.
Radar scan volume: The elevation is shown on the right screen, keep in mind the scan elevation show in this area is at your current max range and not wherever your TID cursor is or selected object. TOP LINE - Upper elevation limit at current max range
MIDDLE - Antenna elevation
LOWER - Lower elevation limit at current max range.
The azimuth is represented by the dashed range lines, they will move left and right to show the current scan volume in azimuth.
http://www.heatblur.se/F-14Manual/general.html#tid-symbology
DDD - 'Detail Data Display Panel'
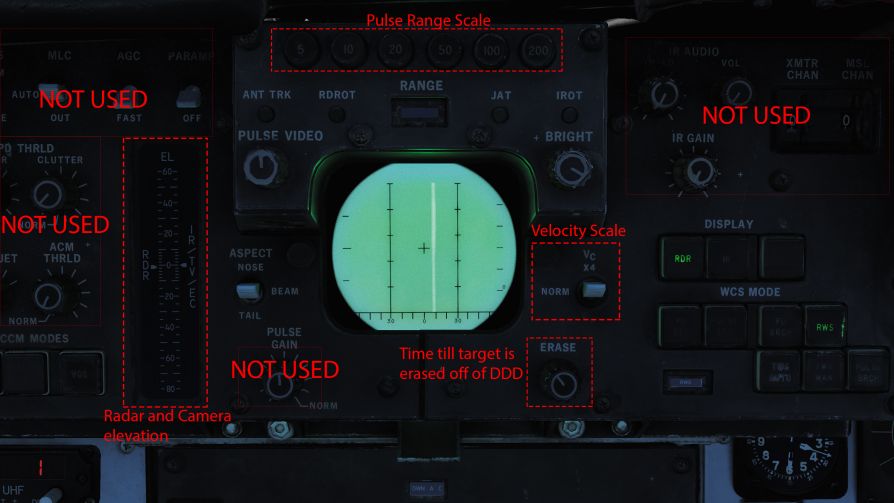
This is one of the AWG-9's radar displays. This display is used to show a more raw unprocessed radar picture than what the processed image which is shown on the TID. This display in PD and RWS and TWS shows data in terms of azimuth vs rate. Meaning the X-axis is the azimuth from your aircraft and the Y-axis is the closer velocity. Additionally this rate is not the relative closing velocity like what you may see on a HUD for a modern aircraft but it instead subtracts out your ownship velocity, or the observed closer rate observed against the ground. This is done because if it wasn't you'd only get an accurate closer reading for in a direct line right in-front of your radar.
The above image indicates the display in PD mode. Keep note the scale can be changed with the X4 switch to the right of the DDD display:
If set to NORM then scale is -200Kts to 800Kts
If set to X4 the scale is -800kts to 4000kts closing, good for large missiles such as the P800.
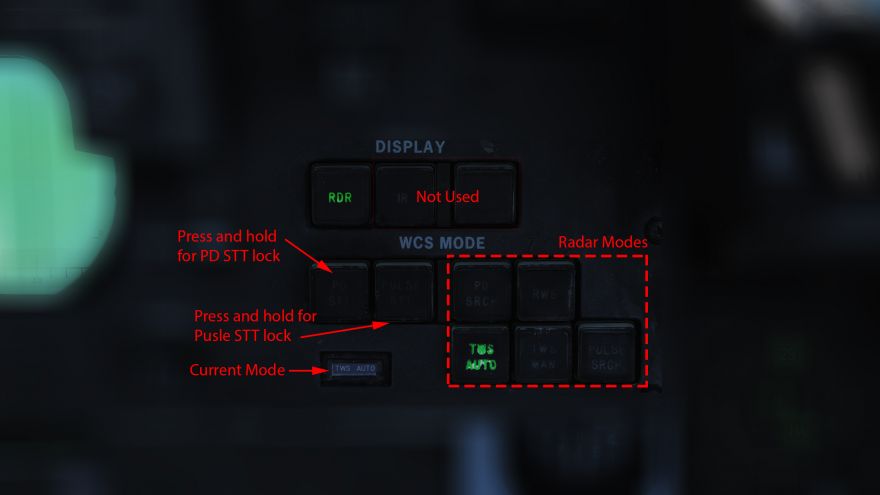
Radar Modes:
PD
- Longest range mode, uses just a PD signal without the FM ranging method. This can provide target detection in excess of 100NMi on most targets. Does not provide ranging information only closing velocity and azimuth.
RWS
- Second Longest range mode, uses a PD signal with FM ranging techniques. This provides detection on large targets, or tight formations of several smaller targets, at ranges just over 100Nmi. Provides ranging, elevation, azimuth, and closing velocity information.
TWS Auto
(Not yet implemented 02/10/2020)
TWS Manual
- Track while scan - A search mode that dedicates part of its search to momentary tracking of a target to provide more detailed elevation and heading information. In TWS manual the RIO controls the location of the search volume in both elevation and azimuth.
Pulse
- Shortest range radar mode, searches with a Pulse signal instead of a PD signal. This mode cannot detect velocity closing due to a lack of FM ranging techniques. Additionally this mode is susceptible to ground clutter, chaff (not yet implemented), and jamming due to a lack of a MTI filter or Doppler filtering. This mode however has no notch and is also useful for locking up ships at sea. However due to the lack of MTI or Doppler filtering you will see ground returns on the scope and picking targets out from this is a skill that will only come by practice. The Pulse radar returns are only showed on the DDD with the range scale being the row of buttons above the DDD.
Pilot Seat
Controls:
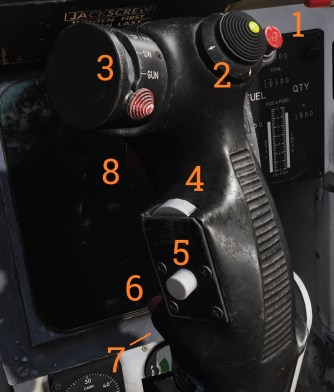
Stick Controls:
- Bomb Release button (RAlt + Space)
- Trim hat
- Weapon select hat
- Up - moves hat up to select weapons above current position
- Down - Moves hat down to select weapons below current position
- Press - switches between Sparrow and Phoenix when in the upmost position
- DLC and Maneuver flap control wheel
- DLC Engage/Disengage button | Countermeasure dispense
- Is DLC engage Disengage only with flaps down and gear down
- Countermeasure program set by RIO
- Autopilot reference button | Nosewheel steering button
- With weight on wheels this button turns the NWS on and off
- With weight off of wheels this button will set you altitude when in AP altitude
- With ACLS engaged this button will engage the final mode of the ACLS mode
- Autopilot emergency disengage paddle
- Weapon trigger
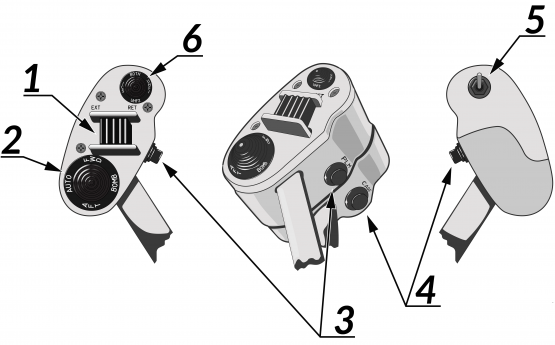
Throttle Controls
- Speed Brake switch
- EXT - Momentary switch that when held extends brake to current extension limit (LCtrl + B)
- RET - Toggle switch that will fully retract the airbrake when pressed (LShift + B_)
- Wing Sweep Hat
- FWD - Wings manually forward
- AFT - Wings manually back
- AUTO - CADC takes over wing sweep
- BOMB - sets wings to 55°'s of sweep, useful for bombing so your not constantly fighting the change in pitch as the wings sweep forward and backward.
- PLM - Close in radar mode, gives pilot control of the radar which will search infront of the aircraft (more below)
- CAGE/SEAM - Button used to command the AIM-9 to lock a target off boresight (much like uncage button on other aircraft)
- Exterior light switch - Turns external lights on and off
- ICS PTT - Comms switch
- ICS - communicates with rio
- Both - transmits on both UHF and V/UHF radios
- UHF 1 - Transmits on main UHF radio
- UHF 2 - Transmits on V/UHF radio
A/A Setup
1) Set HUD to A/A mode
2) ()
3) Master Arm to cover up and switch up.
4) Select Weapon
A/A HUD
Pilot controls over the radar:
PLM
VSL Hi/Low
PAL
