Difference between revisions of "Taxi and Takeoff"
| Line 3: | Line 3: | ||
==Learning objectives== | ==Learning objectives== | ||
| + | #Set up the jet on the ramp | ||
#Taxi to the proper active runway | #Taxi to the proper active runway | ||
#Perform rolling, interval and formation takeoffs | #Perform rolling, interval and formation takeoffs | ||
| − | # | + | #Climb to altitude |
| − | |||
| − | |||
| − | |||
==On The Ramp== | ==On The Ramp== | ||
| Line 22: | Line 20: | ||
Lead always takes downwind side of the runway. The correct visual cue for a wingman to line up on his lead is to align his head with the main gear of the aircraft preceding him. | Lead always takes downwind side of the runway. The correct visual cue for a wingman to line up on his lead is to align his head with the main gear of the aircraft preceding him. | ||
| − | * '''2-ship line up''': Echelon. Lead owns the left side of the runway; Wingman has the other side. | + | *'''2-ship line up''': Echelon. Lead owns the left side of the runway; Wingman has the other side. |
| − | * '''3-ship line up''': Echelon Lead on the far left, #2 on centreline, #3 on far right. | + | *'''3-ship line up''': Echelon Lead on the far left, #2 on centreline, #3 on far right. |
| − | * '''4-ship line up''': Echelon, #3 in the slot. | + | *'''4-ship line up''': Echelon, #3 in the slot. |
Once rolling, aim for the centreline (except for formation takeoffs) Please note, echelon side is left at lead’s discretion but a good lead takes winds into consideration. | Once rolling, aim for the centreline (except for formation takeoffs) Please note, echelon side is left at lead’s discretion but a good lead takes winds into consideration. | ||
| Line 31: | Line 29: | ||
When lined up, turn breaks on, throttle up to 80-ish percent throttle, release the brakes, and then go full afterburner (Gate). The element leader will be calling out and counting down to each action, ensuring a coordinated takeoff. | When lined up, turn breaks on, throttle up to 80-ish percent throttle, release the brakes, and then go full afterburner (Gate). The element leader will be calling out and counting down to each action, ensuring a coordinated takeoff. | ||
| + | Standard Takeoff | ||
| − | + | Rolling Takeoff | |
| − | + | ||
| + | Formation Takeoff | ||
==Climb== | ==Climb== | ||
Revision as of 12:19, 19 December 2022
Contents
Learning objectives
- Set up the jet on the ramp
- Taxi to the proper active runway
- Perform rolling, interval and formation takeoffs
- Climb to altitude
On The Ramp
We do most takeoffs from the Taxiway position. When “takeoff taxi” is called, click the Takeoff button on the 2D screen and select Taxiway.
- Taking the active. - are we open to rolling take off? RL viper pilot Ive been flying with states that formation T/O is done for practice but the norm is for single ship rolling with 1000' spacing, e.g., #1 lights the can or mil power T/O, #2 is at hold-short line; once #1 is rolling #2 takes the active - rinse & repeat for #3 / #4. His rationale is safety and to expedite the process.
- also, are flight leads taking the 'down-wind' side of the runway based on winds?
- Jets loaded with AA missiles and/or forward firing ordinance (mavs/harm etc) ok to do formation T/O. But other bombs on the on the racks it's always interval departures 10 or 20 seconds from what ivve been told. A rejoin is simple if flown 400-450 max if lead maintains 5 deg up 350kts, and if turning to stpt makes for even faster rejoin.
- with formation T/O - if the wingy is not precise with the throttle then it's very hard to stay in formation- what if when lead rolls he/she goes gate/burner @ 100kts so the wingy can make speed corrections prior to burner. Lead burner out at 350 as cited below.
- minimize comms at T/O: do we need to say "brakes set"? If 2/3/4 ship on the active, what if first element lead zippers the mic (2 clicks) for run-up 80% then another zipper that he/she's rolling? 2nd element does the same. No one says in position because FL can tell whether or not the position is correct. No call for 'airborne gear-up' -- last ship calls visual/tied once airborne and proceeds with rejoin.
Line Up
Lead always takes downwind side of the runway. The correct visual cue for a wingman to line up on his lead is to align his head with the main gear of the aircraft preceding him.
- 2-ship line up: Echelon. Lead owns the left side of the runway; Wingman has the other side.
- 3-ship line up: Echelon Lead on the far left, #2 on centreline, #3 on far right.
- 4-ship line up: Echelon, #3 in the slot.
Once rolling, aim for the centreline (except for formation takeoffs) Please note, echelon side is left at lead’s discretion but a good lead takes winds into consideration.
Takeoff
When lined up, turn breaks on, throttle up to 80-ish percent throttle, release the brakes, and then go full afterburner (Gate). The element leader will be calling out and counting down to each action, ensuring a coordinated takeoff.
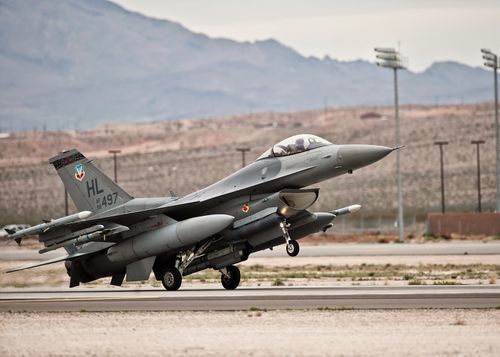
Standard Takeoff
Rolling Takeoff
Formation Takeoff
Climb
After taking off initiate a 10 degree climb and check towards steerpoint 2. Turn the afterburner off at 350 knots.
Combat Departure/Climb
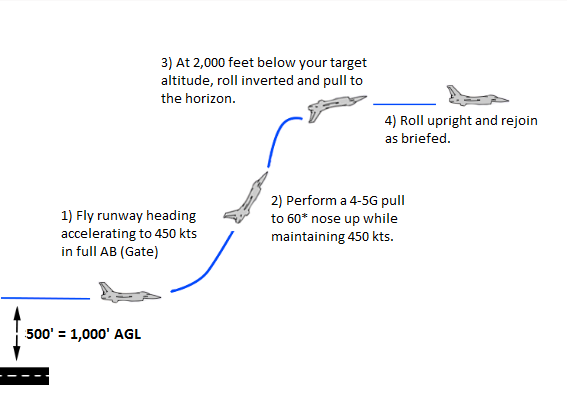
To execute a combat departure, begin the take-off as before (Buster to 100 kts, then Gate) then once airborne fly runway heading while accelerating to 450 KCAS in full afterburner maintaining 1000' AGL (or as briefed), then pitch up 60° using no more than 4-5G. Hold that attitude until within 2,000 feet of your clearance altitude, at which point you roll inverted, pull back down to the horizon before turning back upright at your clearance altitude and setting RPM as needed to maintain airspeed and altitude.
Efficient Climb
For efficient climbs in the F-16: set mil power, reference the entry for your drag index. Pitch to hold the indicated airspeed for in the climb until reaching that mach number, and then pitch to hold the mach throughout the climb.
| DRAG INDEX | KIAS | MACH |
|---|---|---|
| 0 | 445 | 0.84 |
| 50 | 425 | 0.84 |
| 100 | 400 | 0.84 |
| 150 | 385 | 0.82 |
| 200 | 365 | 0.80 |
| 300 | 340 | 0.75 |
| 400 | 320 | 0.68 |
Fence check
The fence check is the final preparation for taking your aircraft into combat.
The flight leader will call “Flight fence in”, at which point you should turn Master Arm switch to ARM, turn your exterior lights off (at night you should leave the anti collision light on), and ensure any weapons that require it are powered on (Mavericks and HARMs, for example).
Confirm the Fence in call by reading off the first three numbers on your fuel gauge.
Comms example:
- Lead: "Flight, fence in. Lead's fenced 091"
- 2: "Two fenced 090"
- 3: "Three fenced 091"
- 4: "Four fenced 089"
{{#invoke:Navbox|navbox}}


