RWR

The Radar Warning Receiver consists of several antennas, a processing unit, a radar library and a display.
It allows the aircraft to detect and identify radio emissions of radar systems reaching the aircraft and is a vital tool in both A-A and A-G operations for identifying, avoiding, evading or engaging threats.
Contents
Learning objectives
- Know how to verify RWR is on and working
- Understand the threat rings
- Recognize the different threats
- Switch RWR radar filters
- Know the difference between NAILS and SPIKE
Learning Files
Video from Krause made with BMS 4.32
General information
Introduction
The RWR interface in the cockpit is made through 3 main components :
- The Threat Warning Prime panel (TWP) is located right next to the RWR display and manages the information displayed. The TWP is made of 6 square lights all featuring a push button. Each indicator has multiple lights (top and bottom) the bottom light comes on when the system is powered and the top light comes on depending on the status of the relevant system, except for the Missile LAUNCH indicator.
- The Threat Warning Aux panel (TWA) is part of the EWS suite. It is made up of 4 indicators (3 with pushbuttons): SEARCH, ACT/PWR, ALTITUDE & POWER.
- The RWR displays threat emitters depending on their azimuth relative to your aircraft. It does not though give distance information. The display is made of two concentric circles: inner and outer. The threats are categorized by order of importance; the more lethal threats are placed in the inner circle while the secondary threats are left in the outer. The symbols displayed on the RWR depend on their radar type.
Note : Other RWRs may be installed in other F-16s and have some differences
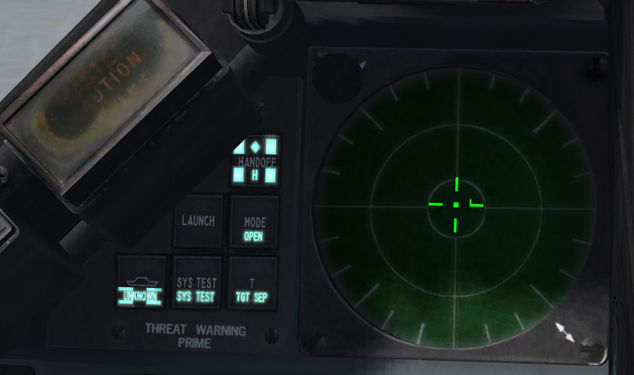
Blank RWR during normal operations (No threats detected)
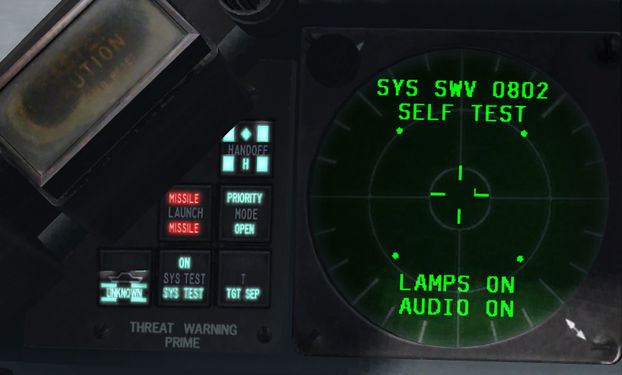
TWP and RWR in BITE test
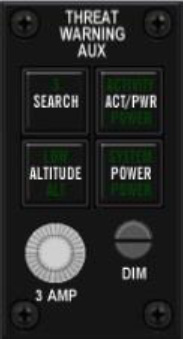
TWA panel


RWR symbols
The following tables are showing the RWR symbols. Airborne symbols are displayed with an inverted V on top of them to differentiate them from the ground emitters.
Note : Those tables are for the US default RWR (ALR-56) Symbology may differ on foreign F16 (IAF, EAF, BAF etc ...)

Those tables does not includes active radar missile (Fox 3) symbology.
When a fox 3 will be active it will be displayed on your RWR using a M symbol (stand for Missile)
Modes of operations
Selectable modes from TWP
HANDOFF
used to set the mode of operation of the RWR. The 4 modes are: Normal, Diamond Float, Transient and Latch.
You should simply know that the mode giving the best Situational Awareness is the Diamond Float mode where the diamond floats to the highest priority symbol. That mode is entered with a short push (less than one second) on the HANDOFF button.
The bottom light of the indicator is on as soon as there is power and the top indicator comes on only when a handoff mode is engaged (Diamond Float, Transient, Latch).
Using the HANDOFF button controls how each of these modes are entered and controls the function of the diamond symbol on the display.
- Normal : In normal, the diamond symbol is inhibited and threat audio is limited to “new guy” (or new threat) alert and missile launch audio. New guy audio is 3 bursts of sound in 1.5 seconds of that emitter. New guy alert is also seen visually by symbols alternating between normal size and 1.5 times normal size for the first 4 seconds of display. Normal mode will yield a fairly quiet RWR.
- Diamond Float : Diamond float mode is entered via a short push of the HANDOFF button. In this mode the diamond symbol on the HANDOFF button illuminates and the diamond on the display floats to the highest priority symbol. Sound for that emitter is heard continuously. Another short push of the HANDOFF button will deselect this mode and go back into normal mode. This mode is recommended for maximum SA.
- Transient : Transient mode is entered by pressing and holding the HANDOFF button. In this mode the diamond symbol steps from the highest priority symbol to the next highest in descending priority order. The diamond will continue stepping for as long as the HANDOFF button is held and audio is played as the diamond enhances the symbol. Releasing the button changes the mode to latched.
- Latch : In latched mode the diamond symbol remains on the last symbol it was on when the HANDOFF button is released. Sound for that emitter is heard continuously. If the symbol times out (emitter no longer detected), the RWR will go back to diamond float mode.
LAUNCH
this indicator flashes at 4Hz as soon as the EWS (Electronic Warfare System) detects a radar missile launched at ownship.
The indicator is backed up by audible warning tones. The indicator features a pushbutton to test the launch warning. Press the button to check the audio tone and indicator light.
PRIORITY (MODE)
enables some declutter of the RWR display by displaying only the 5 most important symbols instead of the usual 12 symbols (16 when UNKNOWN mode is selected).
When the priority MODE button is depressed the RWR enters PRIORITY mode, the top light comes on and the bottom light OPEN goes off, as both lights are mutually exclusive.
When PRIORITY mode is enabled the top PRIORITY light will flash if the EWS detects more than 5 threat emitters. The RWR remains in this mode until the pilot exits PRIORITY MODE by depressing the button again. At that time the top light extinguishes and the bottom OPEN light illuminates.
UNKNOWN (SHIP SYMBOL)
When depressed the top (U) light illuminates and the RWR displays U symbols (unknown radar). It can then also display 16 symbols instead of the usual 12. The pilot can deselect this mode by depressing the pushbutton again. The top light then extinguishes.
SYS TEST
The bottom light of the indicator will be on whenever the EWS is powered. The top light will come on whenever the system test is running.
Depressing the push button will initiate the test sequence that will run for a few seconds. During that time all TWP lights and modes will be tested. Some alphanumeric codes will also be displayed on the RWR.
TGT SEP (T)
Depress this indicator when you want to have a better view of two emitters which are close to each other.
When depressed the top TGT SEP light illuminates and the symbols on the RWR are spread out for 5 seconds. After that time the RWR reverts to normal and the top light extinguishes.
The bottom light is on as soon as power is applied.
selectable modes from TWA
POWER
applies and removes power to the EWS suite. The green indicator comes on when the EWS is powered.
ACT/PWR
is a dual indicator and has no button. The top indicator labelled ACTIVITY comes on if the EWS is powered and detects a radar painting the aircraft. The bottom indicator labelled POWER is on whenever the EWS suite is powered.
SEARCH
allows ‘S’ search radar symbols to be displayed on the RWR display if the EWS is powered and detects a search radar; by default they are not.
With SEARCH enabled a SAM radar in search mode will display as an ‘S’ well before you would expect to see its acquisition symbol if SEARCH was not enabled, giving you an early warning in most cases.
With the SEARCH option not active the green ‘S’ indicator on the TWA will blink at 4Hz whenever the EWS detects a search radar painting the aircraft. In that configuration ‘S’ symbols are not displayed on the RWR.
The green ‘S’ indicator on the TWA will remain lit as long as the SEARCH option is active. A further press of the button deactivates the SEARCH option.
ALTITUDE
is both a pushbutton and a dual indicator. The pushbutton toggles between HIGH & LOW altitude threat assessment biasing. The EWS is able to categorize the SAM threat according to their lethality at low or high altitude.
The top indicator labelled LOW comes on if the EWS is powered when the LOW option is selected.
The bottom indicator labelled ALT comes on whenever the EWS suite is powered.
Quick Tips
RWR setup
- Be sure your RWR is turned ON (green lines in the middle)
- Be sure to use the Handoff Diamond Float mode on your RWR (it will be the default one when you'll spawn in Taxi or TO).
In this mode the highest priority threat will be boxed with a diamond.
Threat Rings
The RWR display is in plan view with your aircraft in the center. As threats are displayed around the center of the display, the icons represent the azimuth direction to the threat.
For example: an icon of the left side of the display would indicate an emitter located off your left. In addition to the icons, an audio system will alert you to the status of the radars detected (search, track, and launch).
The locations of radar emitters and detected missile launches on the display do not necessarily correlate to emitter range from your aircraft.
The distance of the threat icon from the center of the display indicates radar signal strength. The closer the icon is to the center of the display generally indicates the closer the radar is to you.
- If threat is in the outer ring you should be OK and you're not yet in danger.
- If threat is in the inner ring then the ennemy is in lethal range to kill you ! At this time you should have it in sight or you'll finish your day in a POW (best case scenario).
- If threat is right in the middle of the RWR in the tiny circle. Then it is almost at gun range. Better look outside and find him before he's shooting at you with a Fox2 or guns.
Brevity words associated
| Term | Meaning |
|---|---|
| SPIKE (with direction) | RWR indication of an AI threat in track or launch. (E.g. "Spike 23, 6 o'clock" - I have a Mig23 hardlocking me in my 6) |
| NAILS (with direction) | RWR indication of AI radar in search. (E.g. "Nails 29, 10 o'clock" - I have a Mig29 scanning me 10 o'clock) |
| MUD (with direction) | RWR indication of SAM or AAA radar. (E.g. "Mud 5, 2 o'clock" - I have a SA-5 scanning me 2 o'clock) |
| NAKED | No RWR indications on the RWR scope. |
Note: MUD can be combined with SPIKE. This means you're hardlocked by a SAM battery. (E.g. "Mudspike 3, 10 o'clock" - I have a SA-3 hardlocking me at 10 o'clock )
{{#invoke:Navbox|navbox}}