Difference between revisions of "BVR tactics"
| Line 5: | Line 5: | ||
#Home on Jam techniques | #Home on Jam techniques | ||
# When to Chuck your Spears doc. | # When to Chuck your Spears doc. | ||
| + | http://www.unitedoperations.net/w/images/3/3a/When_to_chuck_your_spears.pdf | ||
=BVR techniques= | =BVR techniques= | ||
Revision as of 18:47, 26 March 2017
Learning objectives
- Loft missiles
- Use TWS to lock multiple targets
- Know how to crank
- Home on Jam techniques
- When to Chuck your Spears doc.
http://www.unitedoperations.net/w/images/3/3a/When_to_chuck_your_spears.pdf
BVR techniques
BVR techniques differ each in each engagement according to your capabilities, the targets capabilities and secondary factors like known SAM locations.
If you are able to out range the enemy fighter with your BVR missiles(with for example AIM-120B/C against the Russian AA-10) you can spend more time guiding your missile to the target, whereas in engagements with equal capabilities(for example AIM-120C against AA-12) you need to start your defensive turn as soon as you can get your missile off the rail.
When engaging a target it is favourable if you are at high altitude and high speed prior to the engagement as your missiles will be able to travel further while you will have a lot of altitude you can convert into energy when doing your defensive turn(see BFM).
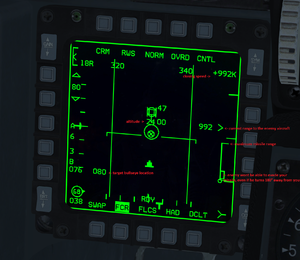
In the image above you can see the typical FCR symbology when engaging a hostile aircraft. On the right of the display you can see a triangle, which indicates the current range of the bogey in relation to the different kill brackets you can see below.
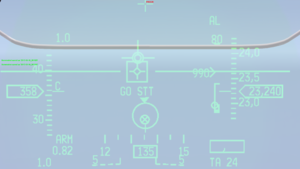
The same symbology is also available in the HUD:
As you close distance to the target the triangle will move down on your HUD/FCR, when it reaches the first large bracket it will be within maximum range of your missile.
At this point the missile could theoretically hit our target, but only if the target keeps flying at the same altitude, bearing and speed. Against a fighter such a shot will most likely not hit, engaging larger aircraft like bombers, tankers or AWACS might yield a kill.
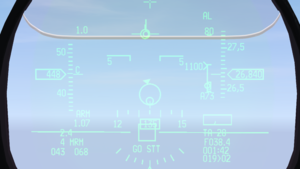
In this last picture the target triangle has moved down the large bracket towards the box at the bottom, this is the high pK(probability of kill) box. While he is still outside of our pK box we can safely take the first shot and discourage our target from turning in to us and firing a missile of his own. If we wait a little longer and close more distance he will be within our high pK box, at which point the target will not be able to evade your missile by simply turning away and kicking the afterburner. The only thing that can save him now is defensive manoeuvres coupled with lots of chaff.
Basic procedure in a BVR engagement
- Approach at high speed and altitude
- Get as close as possible to the high pK box, keep the max range of the enemy aircraft in mind
- Loft your missile by pulling up at a 20° angle while being in full afterburner
- FIRE!!
- Turn left or right and put the target on your beam(3/9 o'clock) while keeping the target within your radar gimbal
- Guide your missile until it either goes active itself(AIM-120C), it hits the target(AIM-7) or you have to turn defensive to evade enemy missile.
Scuby from the 31st VFS has created a few BVR instructional videos on YouTube you can watch to familiarise yourself with some advanced BVR tactics. In his case he is up against a opponent with similar capabilities so you can see him turning defensive earlier than you would have to against a less capable opponent.
{{#invoke:Navbox|navbox}}
{{#invoke:Navbox|navbox}}


