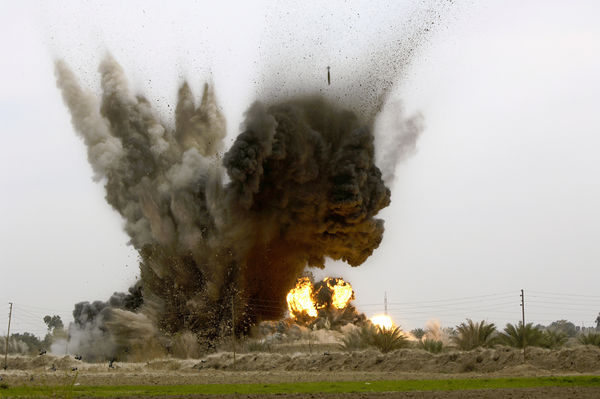
JDAM
Joint Direct Attack Munition are an all-weather smart munition meant to improve ground striking capabilities during bad weather conditions. (Smoke, dust, fog , clouds are causing difficulties for the LGB seekers to keep the laser lock)
JDAM are guided with a GPS-aided inertial navigation system and first seen combat during Operation Allied Force in 1999.
Those are the perfect weapons against static targets like bridges, factories or bunkers.
Contents
Learning objectives
- Know how to align JDAM and when they're fully aligned
- Set up the different settings in the SMS page : Arming Delay (AD) and Impact Azimuth (IMP AZ) (other settings are not implemented in game yet)
- Know the different modes of the JDAM (PRE - VIS)
- Know the flight envelope (offset of no more than 60° from the target bearing)
- Know the basic symbology of the HUD DLZ, LAR2 scale and the speed limitations (DLZ will be blanked when aircraft speeds are less than 0.5 Mach or greater than 1.5 Mach)
- Know how to drop JDAM on target steerpoint coordinates
- Know how to drop JDAM on a target designated with the TGP
- Know the differences between JDAM and LJDAM and their SMS settings (Laser receiver control)
- Be familiar with the 1.6 seconds pickle delay (Depress and hold until the FPM flashes > 1.6 seconds for single, or 3.2 seconds for ripple ! you must hold it until weapon release, otherwise you'll get a HUNG weapon)
Common JDAM Types
Joint Direct Attack Munition or JDAM is a guidance kit fitted to Mk-82/84 dumb bombs to give them all weather attack capability.
GBU-31
1/B
- -Warhead: 945lb BLU-117 (HE)
- -Weight: 2085lbs
- -Range: ~15nm
- -Guidance: INS/GPS
3/B
- -Warhead: 530lb BLU-109 Penetrator (HE)
- -Weight: 2162lbs
- -Range: ~15nm
- -Guidance: GPS/INS
GBU-38
- -Warhead: 192lb BlU-111/B (HE)
- -Weight: 558lb
- -Range: ~15nm
- -Guidance: GPS/INS
GBU-54
- -Warhead: 192lb BlU-111/B (HE)
- -Weight: 558lb
- -Range: ~15nm
- -Guidance: GPS/INS or LaserGuidance
SMS Page (GBU31&38&54)
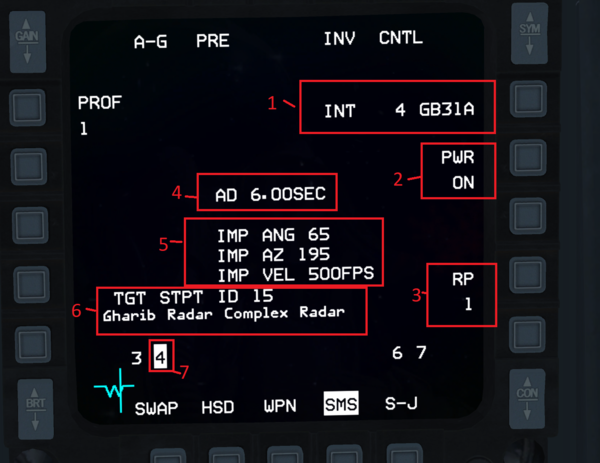
- The number of Weapons, status of weapon (INT- Initializing, A08 - Alignment transfer, RDY - Ready)
Remember it can take up to 3 minutes for your bombs to align so make sure to power them on with enough time before your attack.
- Power ON/OFF
- Ripple quantity
Note that with this if you set RP to 4 and have 4 bombs each bomb will go to the same target unless they are programed in the DED for a specific target. This is a great way to ripple all of your bombs off in one pass for a lofting attack.
- Arming Delay (0-99sec), how long until the warhead of the weapon is armed after release.
- IMP ANG = impact angle (set to 65 in the DED) | IMP AZ = Impact Azimuth or Heading (set to 195 in the DED) | Impact Velocity = velocity at which the bomb will impact (set to 500fps in the DED)
- Target ID = Steerpoint number and target name
- Active weapon station
The gbu-54 will have similar option but has one additional sub page in the sms which is toggled to via osb9 to control the laser.
DED Page (GBU 31&38&54)
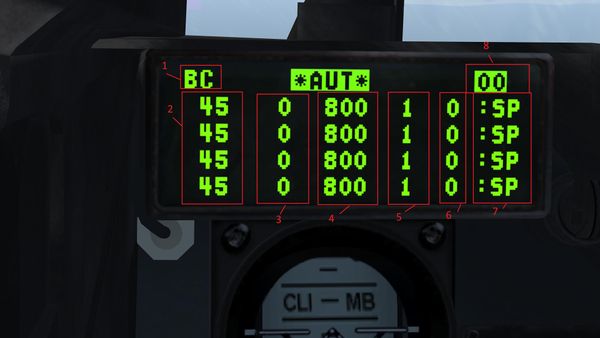
In the DED you can program your JDAM’s to hit specific targets. This functionality is very similar to the SPICE bombs in the Israeli theater. To access the JDAM control page you first press 1seq (in Israeli F-16’s only) then you press 0 followed by another 0.
- Weapon name for JDAM (BC)
- Impact angle - can be used to adjust the angle at which the bomb impacts the ground
- Impact Azimuth - Used to adjust the heading from which the bomb will hit its target (000 -360) *note that 0 means that it will impact from the heading the bomb is released from.
- Impact Velocity
- Ripple Count - Adjusts how many bombs hit each target
- Target STPT (not weapon targets but normal steerpoints!!!)
- SP = Steerpoint
- Current targets page, counts up from 00 so if you have 8 gbu-38’s you will move up to another page as there is a max of 4 programmable targets per page. You can go to the next page by placing the asterisk on this field and press M-SEL on the ICP. (ISRAELI F-16I ONLY!)
HUD(GBU 31&38&39&54)
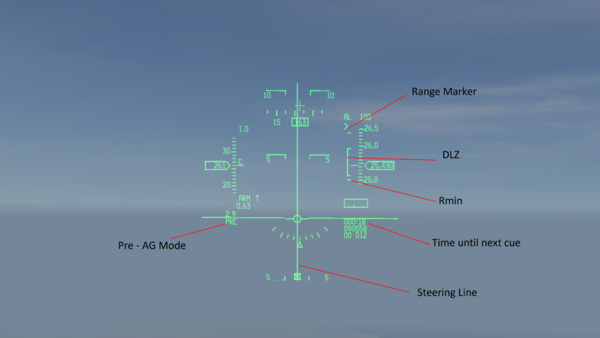
Steering Line = This line will be displayed in CCRP mode, it is the fall line that provides steering guidance to line up with the target to drop your bombs. Placing your flight path marker on the line will line you up the target. This line will also provide the launch cue with a flashing circle when you have reached the appropriate range for lofting. The Hud will also produce a fall line that will tell you when to release your bombs, although with guided munitions you have a window of time where you can release your bombs regardless of the fall line.
Time Until Next Cue = This line will provide the time till the next cue on the HUD. A cue could be the flashing circle indicating the time to pop up for a lofting attack. Or it could provide the time until you can release your weapons.
Rmin = This vertical line represents the minimum range at which you can release your guided weapons. When the range marker falls below this point your weapons can not be released.
DLZ = DynamicLaunchZone, this is the set of ranges from Rmax to Rmin from which you can release your weapons and still hit the target. This zone will automatically adjust its size to fit the current altitude, angle off (from the target), and speed of your jet. For the SDB it will say JIZ when you have met the parameters for the SDB to drop (also you need to be above 300kts to drop a sdb).
Range Marker =
Deployment
Set up
- Set up your target steer points for the targets (I usually use steers 15-25)
- Load up a load of 31/38/39’s
- If using 31/38’s set up the bombs on the DED, at a minimum
- Takeoff and approach the target
- Power on the bombs at least 3 minutes before you want to use them
- If using sdb’s or gbu 54’s set up the bombs in sms page
- Approach the target and release the bombs once you're in parameters.
- Come off the target and rtb.
CCRP
Benefits
- Stay above AAA and Manpad ranges.
- Can have a wingman in A/A scanning for air threats (won’t get jumped quite as easily like in acmi #2).
- Standoff range.
- Saves fuel.
Risks
- Pop-up SAM’s are more dangerous as you will be high and slow
- Visible target to enemy defense network
LOFT
Benefit
- Low altitude you can remain hidden from enemy radar
- Fast ingress/Fast Egress
- Minimal exposure to defenses around the target area.
- Easier to defend against larger SAM systems Sa2/3/4/5/6/10 Sa-11/17 is still dangerous
Risks
- Manpads, Manpads, Manpads, and more MANPADS!!!
- Pop-Up air threats my go undetected by you until they're behind you and killing you…
- “Remember the ground has a PK of 1!”
- Less range than the High altitude CCRP attack.
Example ACMI’s
CCRP - LOFT - https://www.dropbox.com/s/48m1dshzzra5m62/JDAMPopupAttack.zip.acmi?dl=0
{{#invoke:Navbox|navbox}}
