Difference between revisions of "Laser guided bombs"
| Line 20: | Line 20: | ||
The way to check or change the TGP code is by pressing the LIST button on the ICP then navigating to the MISC page by pressing 0 and finally pressing % to access the laser page.<br/> Available codes range from 1111-1788. '''You will also need to change the A-G section from TRNG to CMBT for the laser to fire.''' | The way to check or change the TGP code is by pressing the LIST button on the ICP then navigating to the MISC page by pressing 0 and finally pressing % to access the laser page.<br/> Available codes range from 1111-1788. '''You will also need to change the A-G section from TRNG to CMBT for the laser to fire.''' | ||
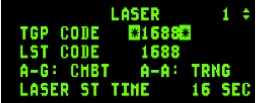
| − | [[File:DEDlaser.jpg| | + | [[File:DEDlaser.jpg|frameless|DED page showing laser codes]] |
=Laser operation= | =Laser operation= | ||
Revision as of 20:16, 22 March 2017
Laser guided bombs are one of the most popular precision guided bombs. In fact first laser guided bombs have seen active service as soon as the Vietnam war. Those bombs are widely represented in BMS and they're a must have against movers or precision targets.
Contents
Learning objectives
- Set up your laser code in the 2D loadout panel
- Set up the Laser page in the DED (combat mode & codes)
- Know the TGP symbology as related to LGBs
- Know the useful functions of the HOTAS when dropping LGB
- Know how to do buddy lasing
Introduction
Laser guided bombs use semi active laser guidance to strike a target with great accuracy. They are most commonly used to strike difficult precision targets. These weapons use on-board electronics to track targets that are designated by laser, typically in the infrared spectrum, and adjust their glide path to precisely strike the target. The most used versions in the BMS F16 are:
- GBU 10 Paveway II(2000lb warhead)
- GBU 12 Paveway II(500lb warhead)
Setup
Setting up the LGBs is a multi-step process starting in the 2D loadout screen. Once in the loadout screen the BOMB laser code can be changed.
You will still need to check the TGP code on your DED once in the 3D.
The way to check or change the TGP code is by pressing the LIST button on the ICP then navigating to the MISC page by pressing 0 and finally pressing % to access the laser page.
Available codes range from 1111-1788. You will also need to change the A-G section from TRNG to CMBT for the laser to fire.
Laser operation
The laser is an essential piece of equipment when employing LGBs as it helps guide the bomb onto its target. Laser is aimed using the TGP, however TGP operation is covered in the Air-to-ground TGP tutorial.
- The laser and LST codes and modes may be set in the DED laser page as shown above.
- The laser mode is set to Training by default for both AA and AG modes.
- The pilot can change the laser code to Combat for AG submode by placing the asterisks on the laser mode label and pressing any numeric key (1-9) on the ICP.
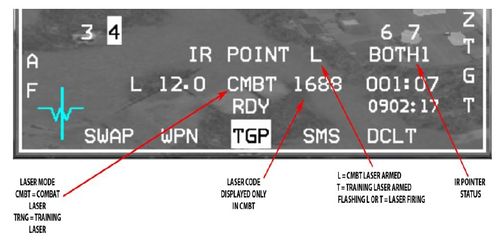
When the laser is armed additional information is included on the lower part of the pod display, below the track status field.
A couple of things to note about the TGP symbology are:
- When the TGP LOS is pointed at the aircraft, laser fire is inhibited.
- Indications of a masked condition includes an M on the TGP page to the right of the L or T in the bottom right portion of the MFD and MASK adjacent to the flight path marker on the HUD.
- There is a warning zone outside of the actual mask zone which alerts the pilot that a mask condition is approaching.
- When in the warning zone the TGP crosshairs flash and MASK flashes on the HUD.
- When conditions warrant for a MASK condition, MASK is displayed steadily on the above mentioned displays.
- When the laser is armed a laser status indication (L for combat or T for training) will appear to the right of the track status label.
- The L or T will flash whenever the laser is firing (manual or automatic mode).
- In order to use the laser, laser arm must be on. It is located just above the Master Arm switch.
LGB Operation
To release the LGBs:
- Master Arm must be set to on and the pilot should be in CCRP mode.
- To guide LGBs:
- the A-G laser must be set to CMBT
- the laser code must match the laser code that was set for the bombs (using the SET CODE button on the LOADOUT screen) or the bomb(s) will not guide on the laser spot.
- During LGB delivery the laser is designed to fire automatically for terminal guidance at the pre-defined time from bomb impact that is set on the laser DED page; the laser will keep firing until 2 seconds after the expected impact time. The pilot can choose to fire the laser manually by using the first trigger detent after bomb release.
Buddy lasing
Buddy lasing in BMS can be useful in dropping your LGBs on a point which another aircraft is lasing. This is a fairly simple process.
- Bomb codes and TGP codes must match. This can be configured in the TGP page and the 2D loadout screen.
- Once they are matched, the aircraft carrying the bombs can drop on the location being lased by a different aircraft either by using a fixed steerpoint/markpoint or by searching for the position using the LST function of the TGP (covered in Air-to-ground TGP).
- The aircraft that is lasing must activate their laser at least 15 seconds before impact as to provide terminal guidance to the bomb.
Useful controls
| TMS Left | Toggle polarity |
| 2x TMS Left | Change sensor (IR/TV) |
| Trigger First detent | Fire laser/IR pointer/Both |
| Pinky switch | Toggle FOV |
{{#invoke:Navbox|navbox}}


