Reference
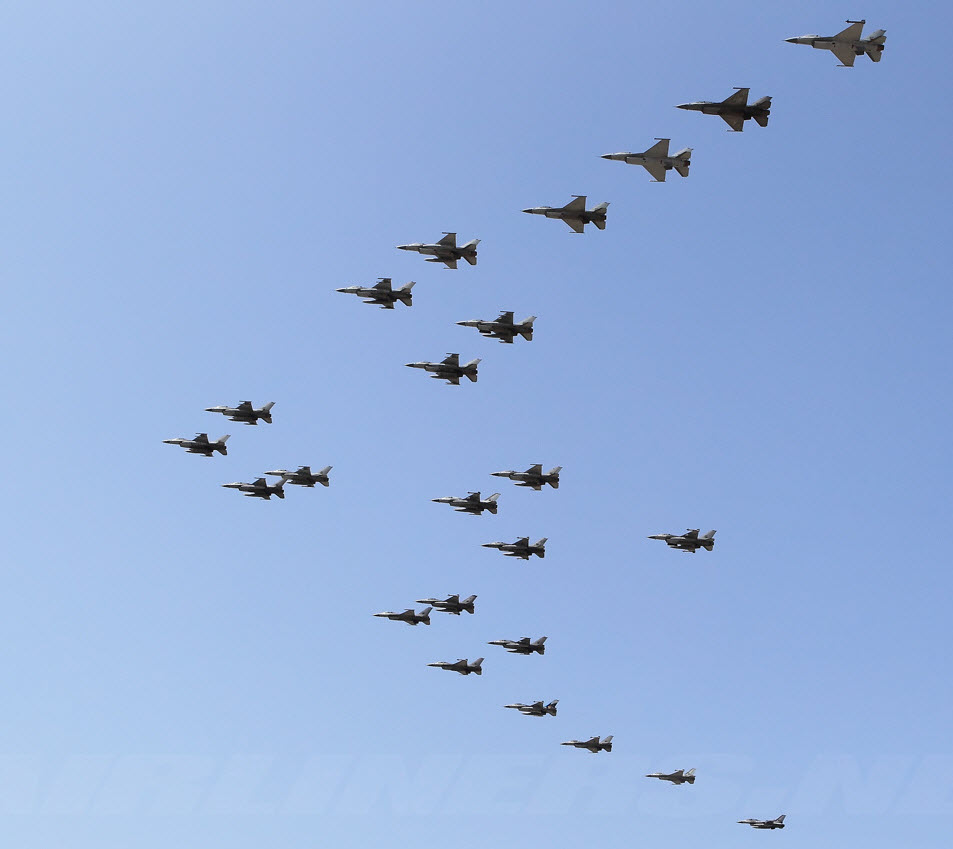
Formation Flying
Basic tactical formation concepts, wingman responsibilities, common UOAF formations, and the core tac turns used to keep a section or flight coordinated.
Learning Objectives
- Understand basic tactical formation concepts and theory.
- Understand why tac-form acts as a force multiplier.
- Understand wingman versus element-lead responsibilities.
- Execute basic tactical formation flying.
Learning Files
Formations
The most common flight formations we use are Wedge and Finger Four, because they are among
the easiest for wingmen to maintain while still giving the flight useful spacing and lookout.
Wedge is basically two fighting wings separated by 3-5 miles.
Remember not to fly too close. Flying wingtip-to-wingtip severely limits your ability to maneuver and restricts your ability to check your six visually. Stay within visual range and far enough to the side that your leader can see you, but also far enough away that you can see altitude changes and maneuver defensively without risking a collision.
Being a Wingman
A flight consists of four aircraft, or ships. The flight leader is #1, the element leader is
#3, and their wingmen are #2 and #4.
In general, the flight and element leads handle the tactical decision-making. The wingmen are there to be an extension of the element leader's senses and firepower.
As a wingman:
- Follow your element lead.
- Watch his back and the surrounding area visually while he is working radar or sensors.
- Engage targets as directed.
- Keep your head outside the cockpit most of the time.
Navigation and radar are not your prime concerns. You still need awareness, but your main job is to stay with lead and keep looking around. If your element lead suddenly changes speed or deviates from the flight plan, follow him first. Call the issue out so he can correct if needed, but stay on him.
When attacking a target, the flight or element lead may call a group and then SORT. That means
you pick the enemy target that corresponds to your place in the formation.
- In a two-ship attacking an enemy two-ship, the wingman normally takes the enemy wingman.
- In a wedge, the left-to-right order from your perspective is roughly
2-1-3-4. - Against an enemy four-ship,
2takes the far-left contact,1takes the next one, and so on. - If datalink is in use, you may also see wingman assignments or a specifically designated target on radar.
Flight Tactics
A flight expecting to engage enemy aircraft will often begin in a wedge formation, with one element
following the other by roughly 3-5 miles.
One common tactic is the grinder:
- The first element gets a contact.
- It fires and turns away toward the second element.
- The second element presses into its own engagement range and does the same.
- The first element turns back in and attacks again.
This grinds the enemy down over repeated passes until they are dead or forced to disengage.
Another, less common, tactic is to fly both elements abreast with 3-5 miles of spacing. If the
enemy commits to one element, that defensive element turns away and drags while the other attacks
from behind.
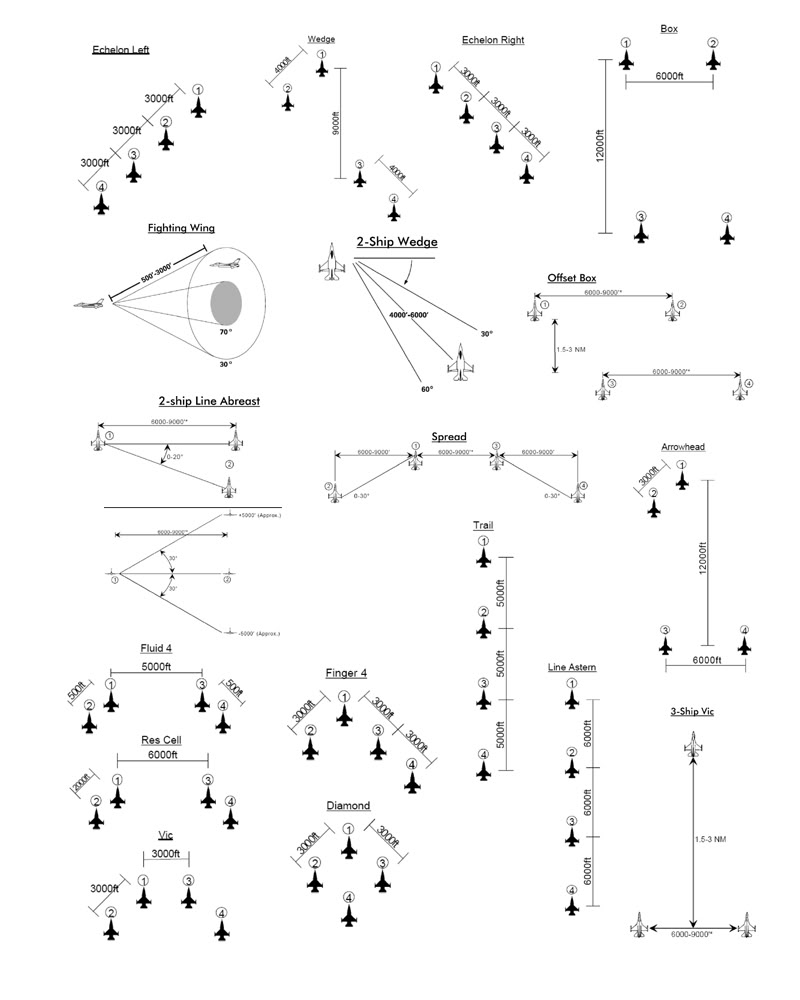
Finger-Tip or Echelon
In the F-16, fingertip can be flown by keeping the lead pilot's vertical stabilizer over the opposite wing. Another common visual cue is lining the wingtip missile up with the intake.
Most pilots tend to fly in a sucked position, meaning they are too far back for the lead to see them. It is better to be wider while holding the correct line of sight than to sit too far aft.
Echelon left or right is the same as fingertip in a two-ship. In a larger formation, everyone
stays on the same side of lead, so #3 flies fingertip off #2, and so on.
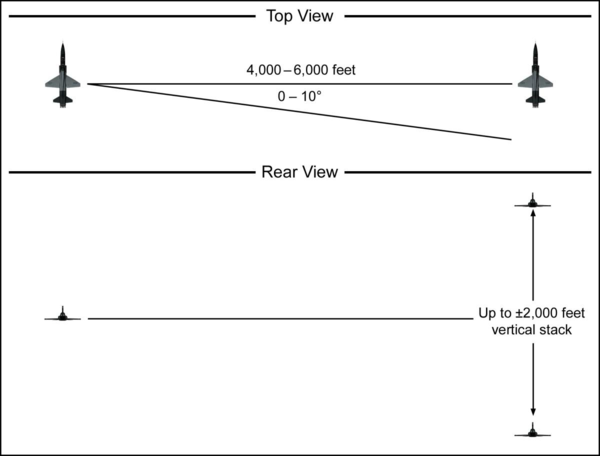
Wedge
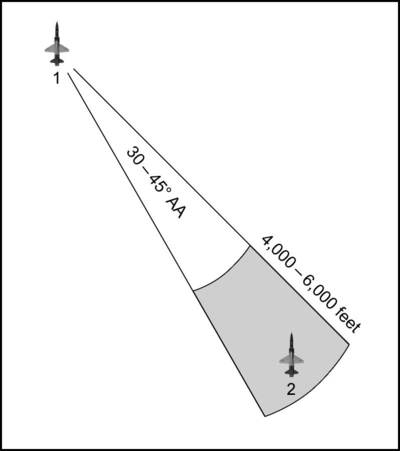
Wedge places the wingman 30 to 60 degrees aft of the leader's 3/9 line and roughly
4,000-6,000 feet back.
Advantages:
- The leader is well protected in the six o'clock area.
- The leader is free to maneuver aggressively.
- The wingman can switch sides during turns as required.
The wingman may also switch sides temporarily to avoid terrain, obstacles, or weather, but should return to the original side unless cleared by the leader.
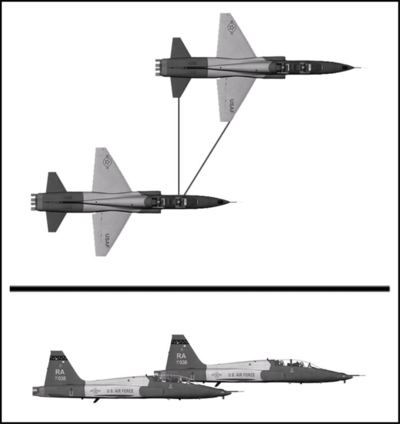
Fighting Wing
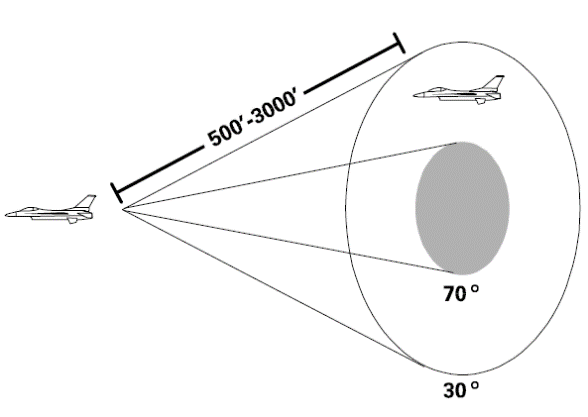
This two-ship formation gives the wingman a maneuvering cone from 30 to 70 degrees aft of line
abreast with lateral spacing of roughly 500-3,000 feet.
#2 maneuvers off lead with cutoff as needed to maintain position. This formation is used when
maximum maneuvering freedom is desired. It is essentially a closer, more flexible version of wedge,
with the wingman free to switch sides whenever needed to support maneuvering or lookout.
Line Abreast or Spread
Line abreast, or spread, places the element lead and wingman side by side with about 1 nm
between them.
It can be harder to fly because pilots must keep checking sideways to confirm position. Stable heading and speed from lead make it much easier to maintain.
Trail
Trail is simply the wingman following directly behind lead at a specified distance, typically
around 1 nm.
The key point is turn timing: the wingman delays the turn slightly and flies to the point where lead started turning before beginning his own turn.
Route and Loose Route
Route is flown to improve visual clearing, increase maneuverability, and make in-flight checks, radio changes, and other cockpit tasks easier.
Route:
- Normally uses spacing out to about
500feet. - Should stay no farther aft than the extended fingertip line.
- Should stay no farther forward than line abreast.
- Should maintain a level stack when wings are level.
Loose route simply opens the formation more, roughly four ship-widths instead of two, which makes heads-down cockpit work even easier.
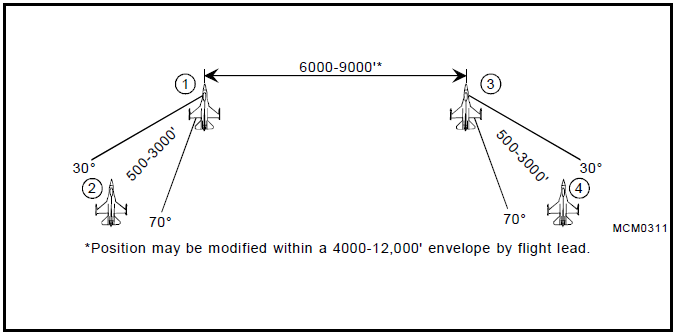
Finger-4
Finger Four is the four-ship version of fingertip and resembles the fingertips of your right hand.
#3mirrors#2on the opposite side.#4flies fingertip off#3.
Fluid-4
Fluid Four is basically two fighting-wing formations flying in spread or line-abreast relation.
During tac turns, #1 and #3 behave as if each is leading a two-ship, and their wingmen flow
with them, switching sides as needed.
Box or Offset Box
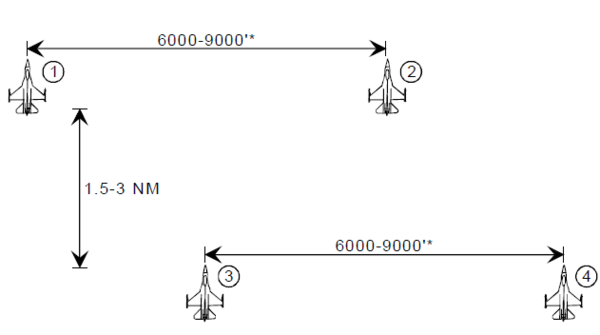
Box is two line-abreast elements with the second element trailing behind the lead element.
Offset Box shifts the trailing element sideways so #3 flies between #1 and #2.
In both box and offset box, #2 is normally on the right side of the flight lead. A flight lead
may brief or call Box Left, which means #2 and therefore #4 remain on the left instead.
Check Turns
Check turns are gentle turns, usually no more than 30 degrees of bank, used for course
adjustments or other minor direction changes.
Some leads will call the turn clearly, for example:
Check right, heading 090.
Others may not announce it at all, especially in close visual formations like fingertip where the change is easy to see. Either way, it is your job to stay on your lead.
Tac Turns
Tac turns are typically initiated from spread or line-abreast with about 0.5-1.0 nm separation.
They maintain a contract speed and are normally flown at MIL power, using about 2-3 G to keep
speed rather than performing hard combat turns.
Plan around about Mach 0.8 when practical. At high altitude or with heavy stores, the turn may be
slow. In general, tac turns preserve the formation even though the positional relationship may
change, such as starting on the right side and ending on the left.
Delayed 90

In a delayed 90-degree turn, the aircraft on the outside of the turn turns first. That could
be the lead or the wingman depending on the direction.
The delayed pilot waits until the turning aircraft reaches a point about 60 degrees behind the
3/9 line, then begins the turn. The formation ends in line abreast, but the aircraft swap sides.
If lead says:
90 right, now.
you can assume the turn is delayed unless he says otherwise.
Hook Turn
In a hook turn, both aircraft start at the same time and turn in the same direction.
Examples:
Hook rightHook left
The aircraft swap sides, but the result remains line abreast.
Shackle

The shackle is used to minimize the time needed to switch sides while also giving both pilots a good opportunity to check each other's six for threats.
It also results in a very close pass similar to a cross turn, so wingman is responsible for deconfliction, normally by deconflicting high.
Cross Turn
Cross turn is related to the hook turn, but both pilots turn into each other instead of the same direction.
That creates a wider line-abreast formation after the 180-degree turn. It is often followed by a
shackle to tighten the formation again.
In-Place 90
In-place 90 looks similar to delayed 90, but both pilots turn simultaneously.
Results:
LABbecomesTrail, orTrailbecomesLAB.
From line abreast, the turn is always made away from the wingman so the flight ends with #2
in trail of lead. A second in-place 90 returns the formation to line abreast.
Lead must explicitly say in-place so it is not confused with the implied delayed 90.
Delayed 45
Delayed 45 works like delayed 90: the aircraft on the outside of the turn turns first.
The inside pilot may need a small check turn toward the other aircraft to help the geometry before
continuing in the called direction.
There is no such thing as an in-place 45, so just like delayed 90, the word delayed is often
left unsaid and implied by the call.